A comprehensive guide for integrating Amazon and Brightpearl, covering account connections, configuration settings, product mapping, and log management.
Introduction
What is Amazon and Brightpearl Integration?
The Amazon-enhanced connector is a tool that links your E-commerce platform to the ERP platform, facilitating the seamless exchange of data. This ensures continuous access to various information such as refund details, returned item details, inventory transfers, damaged/lost inventory, deemed inventory, and removal shipments. The steady flow of consistent data between the platforms enhances operational effectiveness and efficiency.

Connector Flows
Breaking down the functionalities based on each module:
- Refund Orders: Whenever a refund/return is requested, we create a “sales credit” for the same under Brightpearl.
- Return Inventory: Synchronizes the return inventory data of FBA & MFN return orders from Amazon to Brightpearl. We restock it, invoice it, and mark the Sales Credit (SC) as paid.
- Damaged/Lost Inventory: Handles damaged and lost inventory and reflects this in Brightpearl from Amazon.
- Deemed Inventory: Manages deemed inventory (products that are expired or past their expiry date) and reflects this in Brightpearl from Amazon.
- Inbound Shipments: An inbound shipment refers to the process of sending products or inventory to an Amazon Fulfillment Center (FC) or warehouse. This is typically done by sellers using Amazon's Fulfillment by Amazon (FBA) service, where Amazon handles the storage, packing, and shipping of products on behalf of the seller.
We synchronize Inbound shipments by matching the SKU between the platforms from Amazon to Brightpearl. When an Inbound shipment is shipped to Amazon, we update the tracking information in GON and mark it as shipped when Amazon marks it as Shipped. When Amazon receives the inventory, our system pulls that report and releases the inventory from Transfer to the FBA warehouse of BP. - Inbound Shipments Receipt: When Amazon receives inventory for those inbound shipments, our system pulls those reports and releases the inventory from Transfer to the FBA warehouse of BP.
- DropShips: Dropshipping on Amazon is a business model where a seller does not keep the products they sell in stock. Instead, when a sale is made, the item is purchased from a third party (usually a wholesaler or manufacturer) and shipped directly to the customer. The seller doesn't physically handle or store the product.
In this case, when we receive data of Dropships, we link it to the Purchase Order under Brightpearl with the shipment IDs. Once the inventory is received from Amazon, we create a Goods-in note for that under Brightpearl. - Removal Order Shipment FBA:
For this, we have two options in the connector:
a) Inventory transfer - When we receive removal orders of FBA from Amazon, we create an Inventory transfer under BP.
b) Adjustment - When we receive removal orders of FBA from Amazon, the Inventory count is deducted from the FBA warehouse.
How to Get Started with BrightConnect?
Connecting Your Account
1. Log in to BrightConnect
Note: If you don’t have an account with BrightConnect yet, you can email us at contact@apiworx.com, and we’ll get back to you as soon as possible.

2. Connect Your Amazon and Brightpearl Accounts
3. To connect your Amazon and Brightpearl accounts, please follow these steps:
Connecting Your Brightpearl Account
a. Access General Settings: Go to the General Settings of BrightConnect, enter your Brightpearl Account code, and click on the "Connect" button.
This will redirect you to the Brightpearl login page (if you are not already logged in).

b. Login to Brightpearl: Log in with your Brightpearl credentials.
c. Approve Access: Click on “Approve” to allow BrightConnect to access your Brightpearl data.

After approval, you will be redirected back to the General Settings page of BrightConnect, where you should see a success message.
d. Complete the Process: Click on the “Click here to complete the process” option.
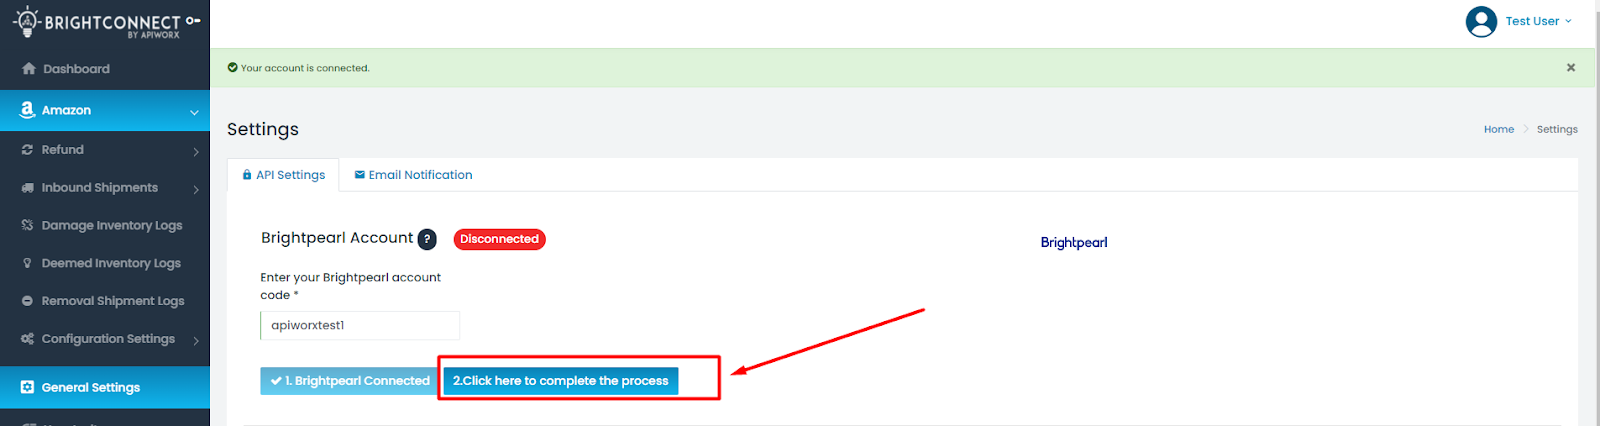
Once Brightpearl is connected, our system will begin fetching all the necessary data from Brightpearl. You will be notified via email once the process is complete. To start syncing, you’ll need to configure the settings by going to the Settings page of BrightConnect.
4. Steps to Connect Your Amazon Account:
Step 1 – Configure SP API Settings
- Navigate to the General Settings page.
- Select the SP API method.
- Add your Amazon account name, Selling Region, and Marketplace ID.
- Click on "Connect".

Note: The Account Name is simply a friendly identifier for your Amazon account to help avoid confusion in the future. For instance, if you have two Amazon stores, one in the US and another in the EU, you might name them "Amazon US Account" and "Amazon EU Account" respectively.
Step 2 – Authentication
-
After clicking "Connect", a page similar to the attached image will appear.
-
Enter your email and password as prompted.
-
An OTP (One-Time Password) will be sent to the email or phone number you entered.
-
Enter this OTP to complete the connection process.
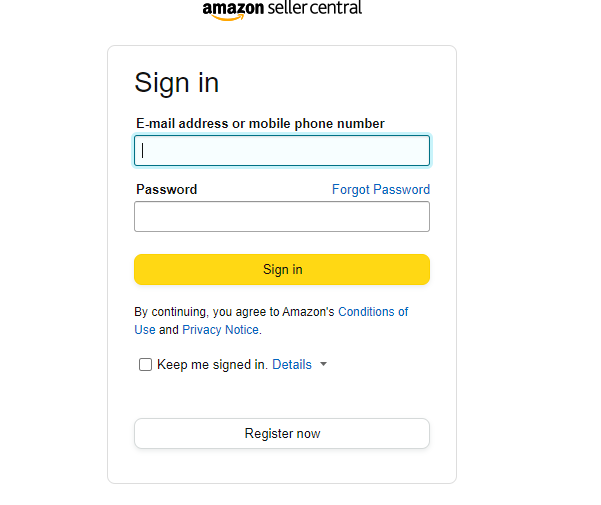
Once these steps are completed, your Amazon account will be successfully connected.
Configurations
Follow these steps to complete the configuration settings:
1. Navigate to Configuration Settings: Access the configuration settings and mapping in the connector. This interface resembles the image provided below.
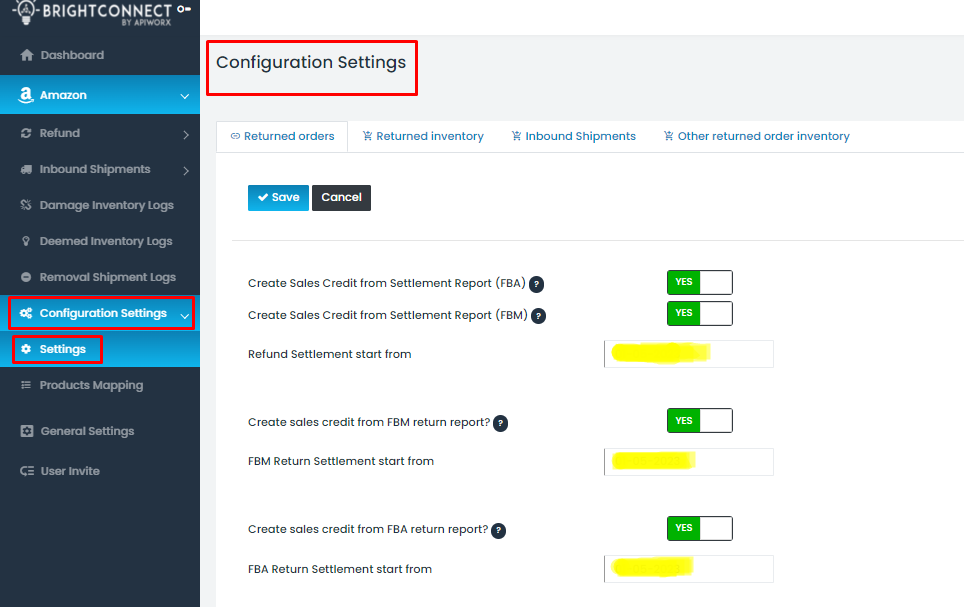
2. Complete Necessary Settings: Ensure that you complete all settings related to Returned Orders, Returned Inventory, Inbound Shipments, and other aspects of Returned Order Inventory.
3. Save Mappings: After completing the settings, make sure to save the mappings.
4. Finalize the Process: Once all the steps are completed, you are ready to begin your journey with the APIWORX integration.
Configuration Settings for Returned Orders
1. Create Sales Credit from Settlement Report (FBA): Enabling this switch syncs Sales Credit in Brightpearl received from the Amazon settlement report for Fulfillment by Amazon (FBA).
2. Create Sales Credit from Settlement Report (FBM): Enabling this switch syncs Sales Credit in Brightpearl received from the Amazon settlement report for Fulfillment by Merchant (FBM).
3. Refund Settlement Starts From: This is a date filter that helps to ignore data older than your live date with the connector, if received in the Amazon settlement report.
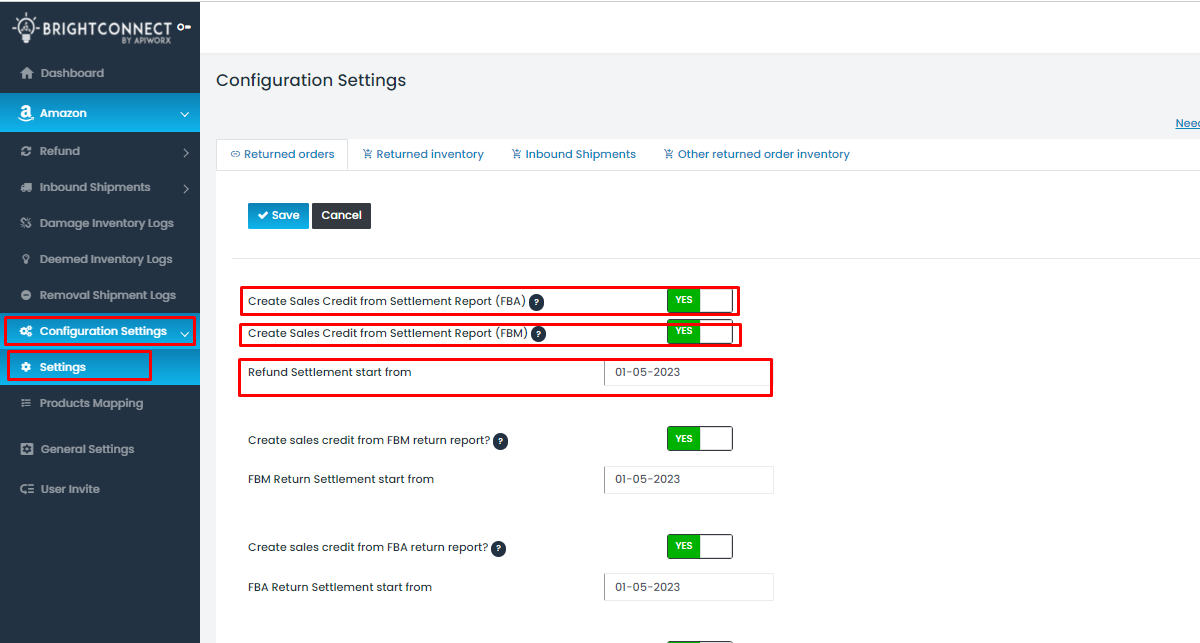
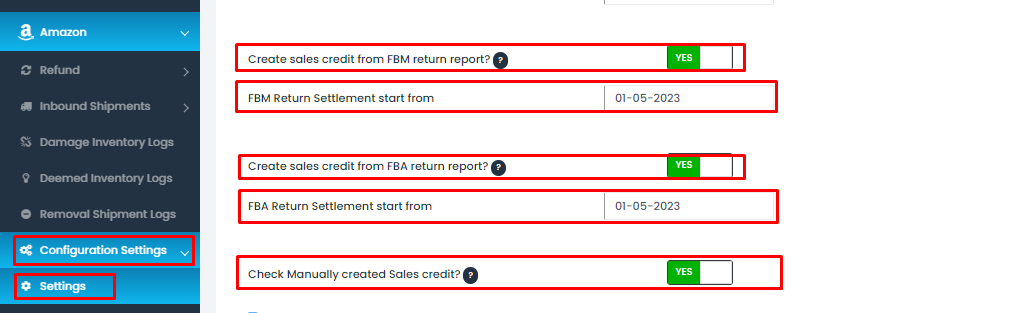
4. Create Sales Credit from the FBM Return Report: Enabling this switch syncs Sales Credit data from the Amazon return report for Fulfillment by Merchant (FBM).
5. FBM Return Settlement Starts From: This date filter helps to ignore older data (such as data before your live date with the connector) if received in the Amazon return report (FBM).
6. Create Sales Credit from the FBA Return Report: Enabling this switch syncs Sales Credit data from the Amazon return report for Fulfillment by Amazon (FBA).
7. FBA Return Settlement Starts From: This date filter helps to ignore older data (such as data before your live date with the connector) if received in the Amazon return report (FBA).
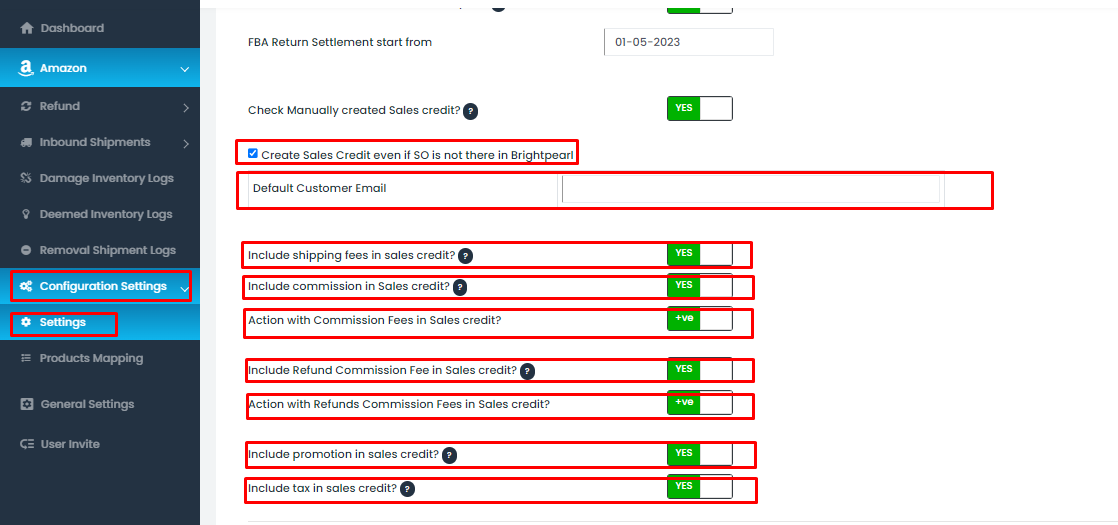
8. Check Manually Created Sales Credit: Enabling this switch helps to avoid duplicating Sales Credit. If a Sales Credit is already manually created by you, the system will not create a duplicate.
9. Create Sales Credit Even if SO Is Not in Brightpearl: Enabling this switch allows for the creation of Sales Credit without linking it to a Sales Order. This feature is useful if you start using Brightpearl after clearing all logs, and a settlement report is received soon after going live with the connector. This allows for creating Sales Credit without connecting it to the parent Sales Order.
-
Default Customer Email: Add a default email so that Sales Credit will be created in Brightpearl using the default customer address.
10. Include Shipping Fees in Sales Credit: Enabling this switch adds shipping fee details when creating Sales Credit in Brightpearl.
11. Include Commission in Sales Credit: Enabling this switch syncs commission details when creating Sales Credit in Brightpearl.
12. Action with Commission Fees in Sales Credit: Enabling this switch will positively sync commission fees. Disabling it will negatively sync the commission details in Brightpearl, depending on whether the amount is credited or debited from the seller’s account.
13. Include Refund Commission Fees in Sales Credit: Enabling this switch syncs refund commission details when creating Sales Credit in Brightpearl, depending on whether the amount is credited or debited from the seller’s account.
14. Action with Refund Commission Fees in Sales Credit: Enabling this switch positively syncs refund commission fees. Disabling it will negatively sync the refund commission details in Brightpearl, again depending on whether the amount is credited or debited from the seller’s account.
15. Include Promotion in Sales Credit: Enabling this switch syncs promotional details, such as discounts, when creating Sales Credit in Brightpearl.
16. Include Tax in Sales Credit: Enabling this switch syncs tax details when creating Sales Credit in Brightpearl.
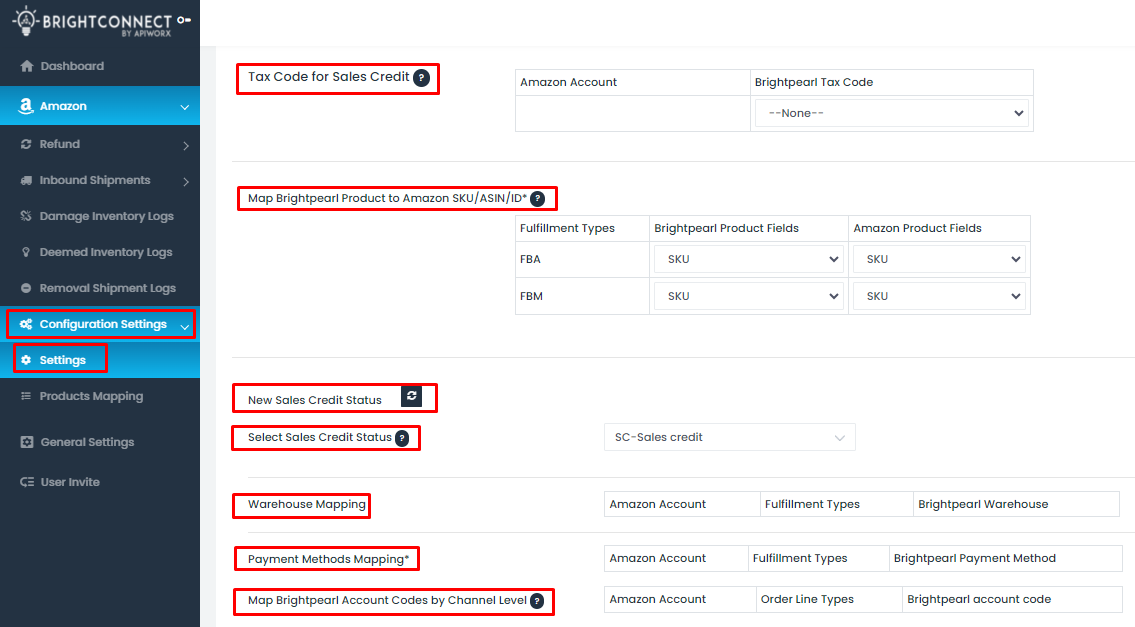
17. Tax Code for Sales Credit: Select the appropriate tax code from the dropdown menu to sync Sales Credit with the tax code in Brightpearl.
18. Map Brightpearl Product to Amazon SKU/ASIN/ID: Select the Product identifier from the dropdown for both Brightpearl and Amazon for FBA and FBM.
19. New Sales Credit Status: Click on "resync" to fetch new Sales Credit statuses added in Brightpearl.
20. Select Sales Credit Status: Choose the desired status of Sales Credit from the dropdown list. Once selected, the Sales Credit will be created in Brightpearl with the chosen status.
21. Warehouse Mapping: Map the Brightpearl warehouse according to the fulfillment types.
22. Payment Method Mapping: Map the Brightpearl payment method according to the fulfillment types.
23. Map the Brightpearl Account Code by Channel Level: Map the Brightpearl account code with different order line types.
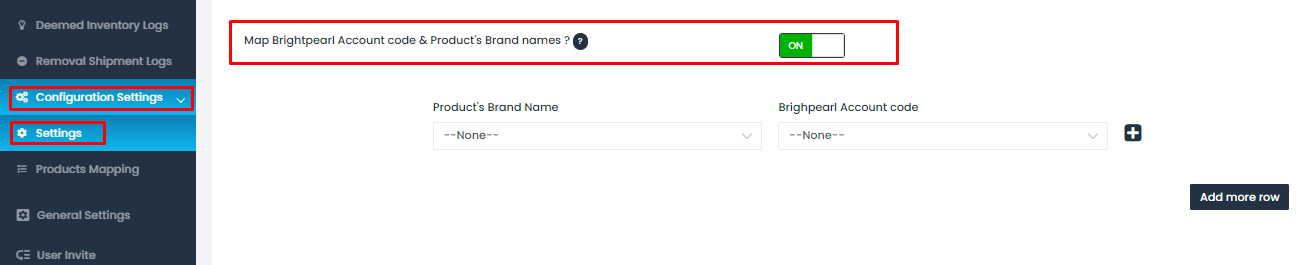
24. Map Brightpearl Account Code and Product’s Brand Name: Enabling this switch will allow you to map the Brightpearl account code based on the product’s brand name.
Returned Inventory
1. Restock FBA Returns: Enable this switch if you want FBA item details to sync when restocking an item in Sales Credit (SC).
2. FBA Return Starts From: This is a date filter that helps to ignore older data (such as data before your live date with the connector) if received in the Amazon return report (FBA).
3. Restock Unsellable FBA Returns: Enable this switch if you want to restock unsellable FBA items.
- Select a Location for Restocking Unsellable FBA Returns: After enabling this switch, another mapping option will become available for selecting the restocking location, such as quarantine or default, for unsellable items.
4. Restock FBM Returns: Enable this switch if you want FBM item details to sync when restocking an item.
5. FBM Return Starts From: This is a date filter that helps to ignore older data (such as data before your live date with the connector) if received in the Amazon return report (FBM).
6. Sales Credit Invoicing (Close): Enable this switch if you want to close/invoice the sales credit.
7. Auto Invoice Older Sales Credit: Enable this switch if you want to automatically invoice Sales Credit after 30 days. This is useful if the return process takes longer than expected and you wish to have them invoiced in Brightpearl.
- Use Today’s Date as a Tax Date When Auto-Invoicing: After enabling the auto-invoice switch for 30 days, another option will appear. If you want to use today’s date as the tax date when invoicing older sales credits, enable this switch. Alternatively, if you prefer to use the “Sales Order’s Date” in the tax date field of the Sales Credit, disable this switch.
8. Sales Credit Invoicing Starts From: Select the date from which you want the Sales Credit to be automatically invoiced.
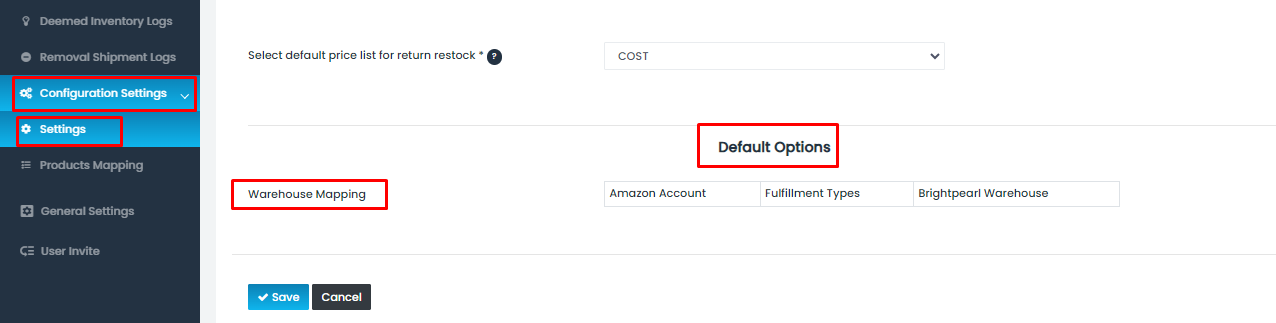
9. Select Default Price List for Return Restock: Choose a default price list from the given dropdown list. If not selected, the "cost price" will be used by default when restocking items in Brightpearl.

10. Warehouse Mapping for Restocking: Select the default warehouse mapping for restocking items, based on your Amazon account and fulfillment types.
Inbound Shipment
1. Sync Inbound Shipment to Brightpearl: Enabling this switch allows you to sync/create inventory transfer entries in Brightpearl. There are two options available:
a) Transfer from Own Warehouse to Amazon: When this option is checked, an inventory transfer entry will be created, and a Goods Out Note (GON) will also be generated in Brightpearl.
b) Supplier Dropship to Amazon: When this option is checked, dropship data will be synced by linking a Purchase Order (PO) in Brightpearl.
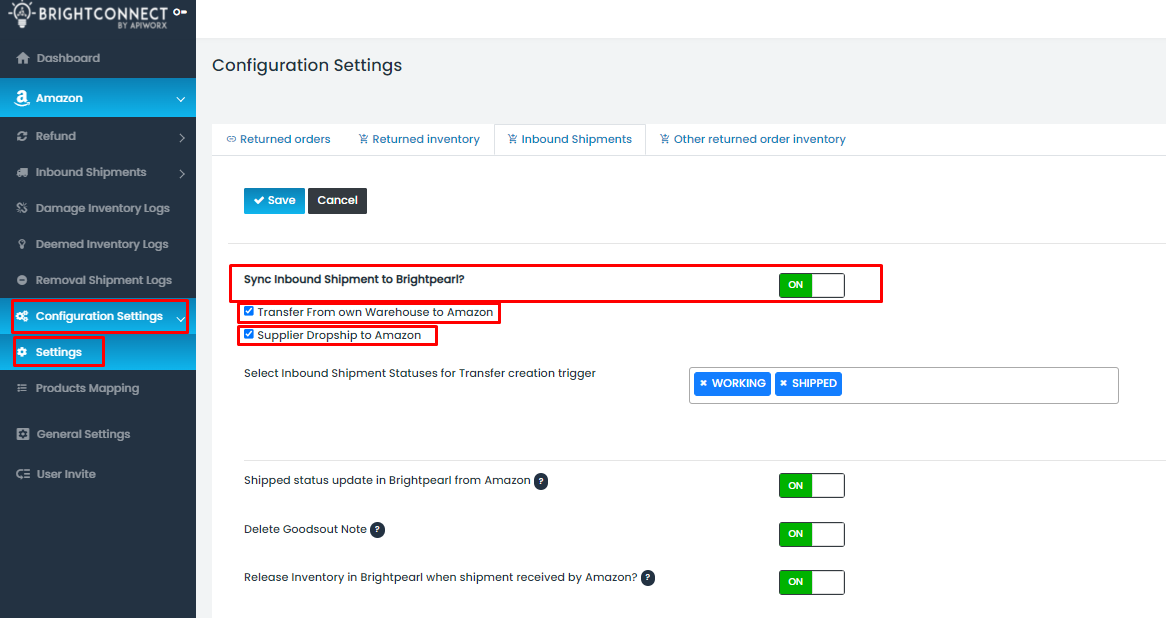
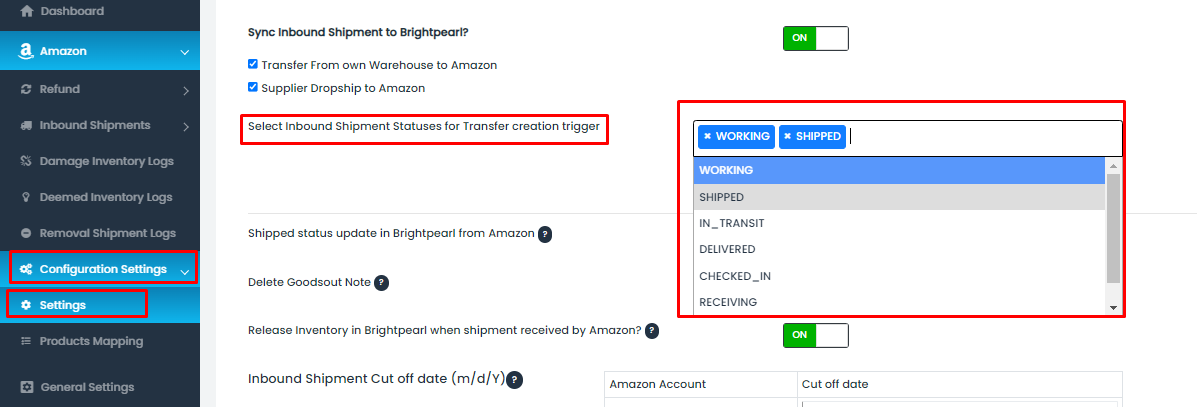
c) Select Inbound Shipment Statuses for Transfer Creation Trigger: These statuses act as triggers to retrieve shipment details from Amazon. We recommend using all the statuses to obtain comprehensive information related to inbound shipments.
2. Shipped Status Update in Brightpearl from Amazon: Enabling this switch will update the shipped status in the Goods Out Note (GON) created in Brightpearl after the status is updated as 'Shipped' by Amazon.
3. Delete Goods Out Note: Enabling this switch will delete the GON created in Brightpearl if the shipment is canceled or deleted by Amazon.
4. Release Inventory in Brightpearl When Shipment is Received by Amazon: Enabling this switch will release the inventory once the shipment is marked as shipped by Amazon.
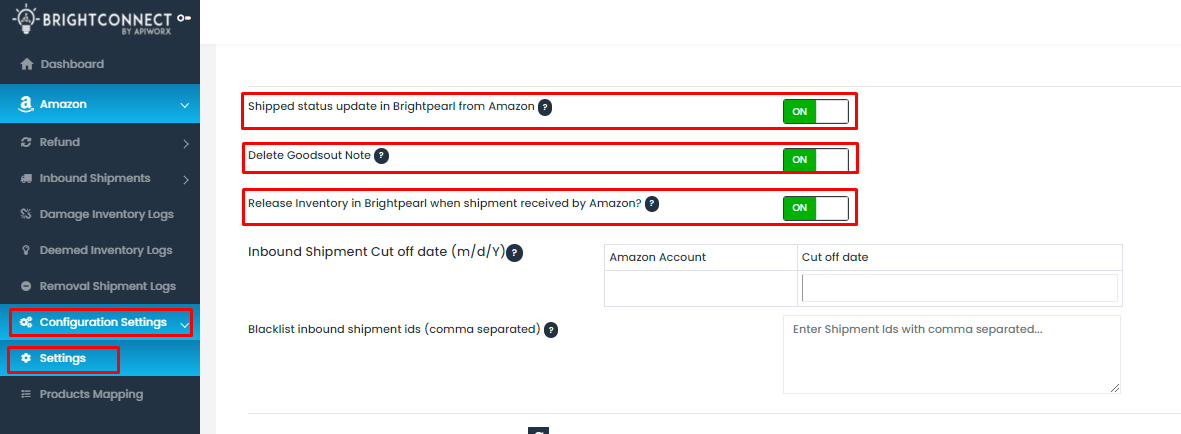
5. Inbound Shipment Cut-off Date (MM/DD/YYYY): Enter a date to exclude older inbound shipments from inventory transfer creation in Brightpearl.
6. Blacklist Inbound Shipment IDs (Comma Separated): Enter the inbound shipment IDs you want the system to ignore, separating them with commas. It's recommended to include all older shipment IDs here (i.e., before the go-live date).

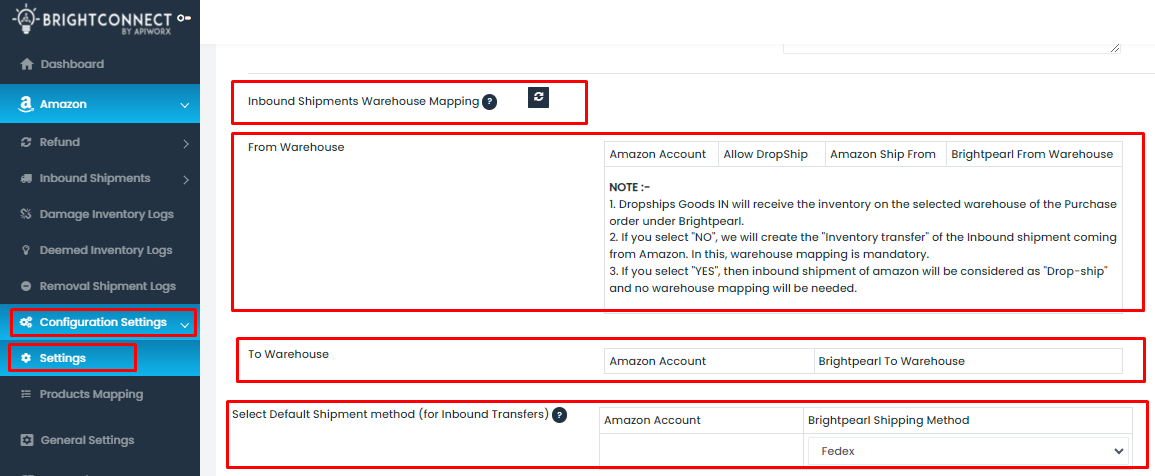
7. Inbound Shipment Warehouse Mapping (Refresh): If you have added a new warehouse in Brightpearl, this will refresh the mappings for the warehouse in Brightpearl.
8. From Warehouse (Source Warehouse):
-
If you select “No” for allowing dropship, it will be treated as an inventory transfer, and it is mandatory to select a warehouse from Brightpearl.
-
If you select “Yes” for allowing dropship, in the case of a dropship, it is not mandatory to select a warehouse from Brightpearl.
9. To Warehouse: Select the Brightpearl “to/destination” warehouse corresponding to the particular Amazon account for inventory transfer entry creation in Brightpearl.
10. Select Default Shipment Method (for Inbound Transfers): Select the default shipment method corresponding to the particular Amazon account to update under the GON of Brightpearl.
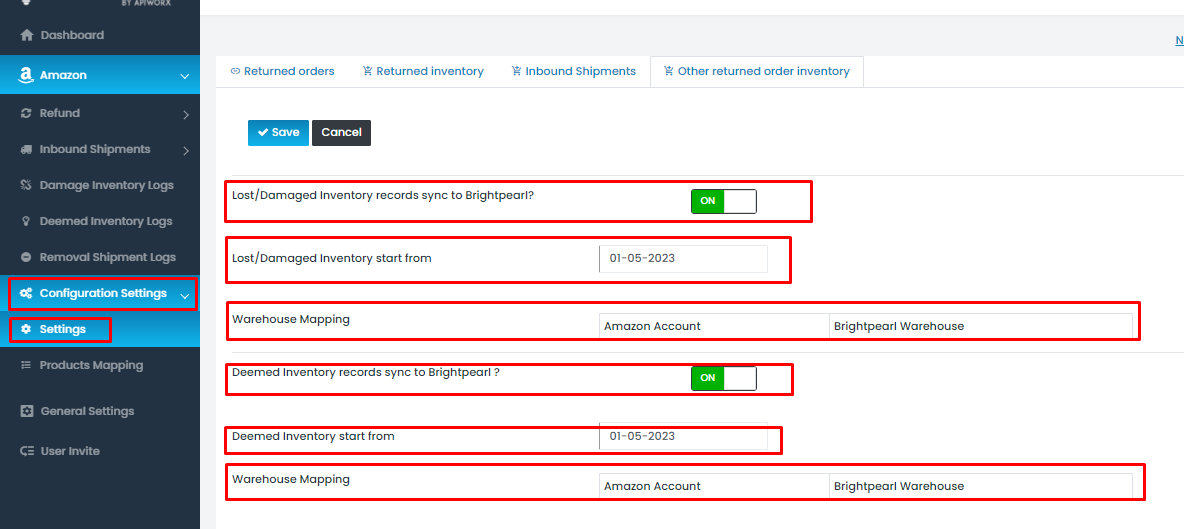
Other Returned Orders Inventory
1. Lost/Damaged Inventory Records Sync to Brightpearl: Enabling this switch will sync data in Brightpearl for lost and damaged goods in Amazon (we adjust this inventory in Brightpearl).
2. Lost/Damaged Inventory Start From: This is a date filter that helps to exclude older data (such as data before your live date with the connector) if received in the Amazon adjustment report.
3. Warehouse Mapping: Select the Brightpearl warehouse for lost and damaged items related to the specific Amazon account.
4. Deemed Inventory Records Sync to Brightpearl: Enabling this switch will sync data in Brightpearl for deemed or expired goods in Amazon (we adjust this inventory in Brightpearl).
5. Deemed Inventory Start From: This is a date filter that helps to exclude older data (such as data before your live date with the connector) if received in the Amazon adjustment report.
6. Warehouse Mapping: Select the Brightpearl warehouse for deemed or expired items related to the specific Amazon account.
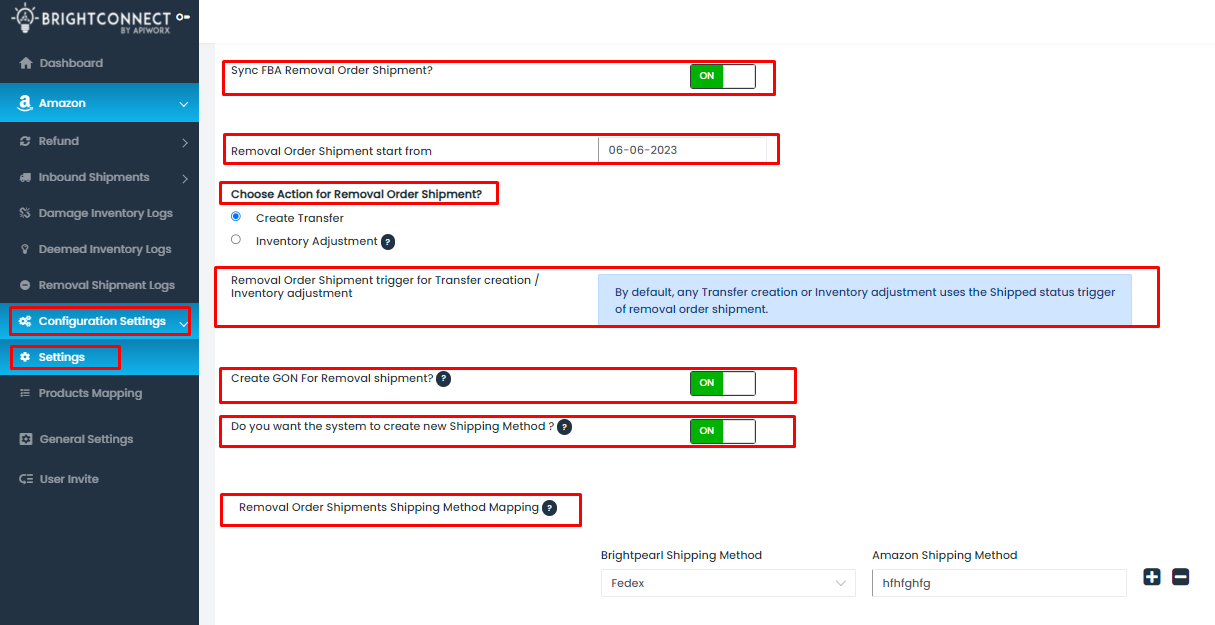
7. Sync FBA Removal Order Shipment: Enabling this switch will sync data in Brightpearl for removal order shipments in Amazon (we adjust this inventory in Brightpearl).
8. Removal Order Shipment Starts From: This is a date filter that helps to exclude older data (such as data before your live date with the connector) if received in the Amazon removal report.
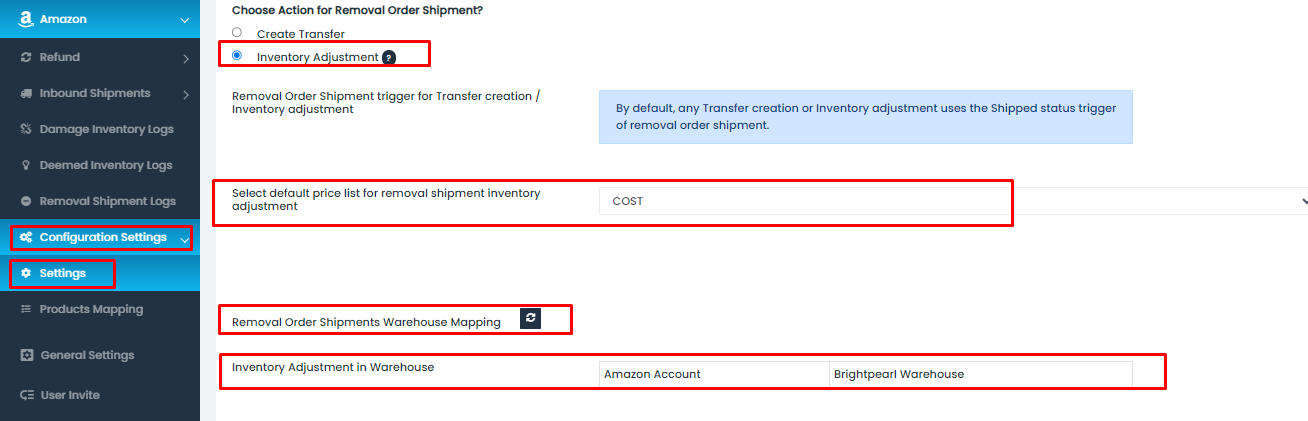
9. Choose Action for Removal Order Shipment: Select an action from the following options for items that need to be removed from Amazon:
a) Create Transfer: A Goods Out Note is created in Brightpearl while creating inventory transfer.
b) Inventory Adjustment: In case of adjustment, the inventory count will be deducted from the FBA warehouse.
10. Removal Order Shipment Trigger for Transfer Creation/Inventory Adjustment: By default, any transfer creation or inventory adjustment uses the 'Shipped' status trigger for removal order shipment.
*Inventory Transfer
11. Create GON for Removal Shipment: Enabling this switch will create a Goods Out Note (GON) for the removal shipment order.
12. Create a New Shipping Method: Enabling this switch allows the system to create a new shipping method in Brightpearl if it does not already exist.
13. Removal Order Shipment Shipping Method Mapping: Select the appropriate Brightpearl shipping method from the dropdown to map with Amazon's custom shipping method.
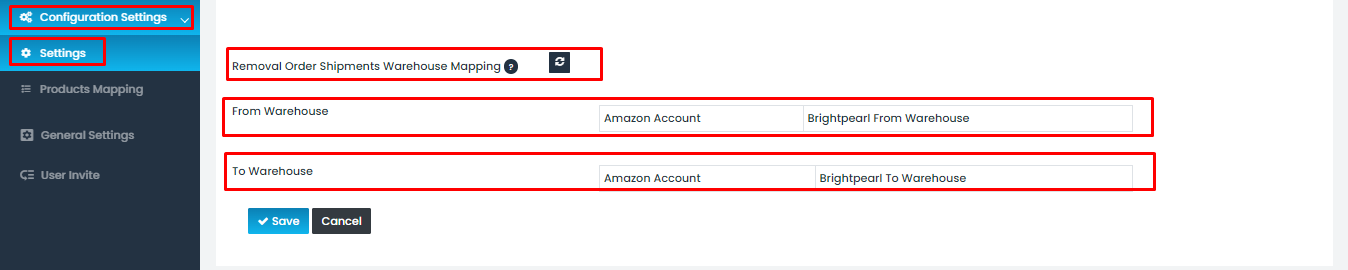
14. Removal Order Shipment Warehouse Mapping (Refresh): After the removal shipment is created, a warehouse transfer will be initiated in Brightpearl. The refresh button allows you to update the warehouse mapping if a new warehouse has been added to Brightpearl.
15. From Warehouse: Select the Brightpearl “From/source” warehouse corresponding to the specific Amazon account.
16. To Warehouse: Select the Brightpearl “To/destination” warehouse corresponding to the specific Amazon account.
*Inventory Adjustment
17. Select Default Price List for Removal Shipment Inventory Adjustment: Choose the default price from the given dropdown list for removal shipment inventory adjustments, deciding whether it will be at cost or sale price.
18. Removal Shipment Warehouse Mapping (Refresh): The refresh button enables you to update the warehouse mapping if a new warehouse has been added to Brightpearl.
19. Inventory Adjustment in a Warehouse: Select the appropriate Brightpearl warehouse corresponding to the specific Amazon account for inventory adjustment.
How to Do Product Mapping in the Connector?
Follow these steps to map products if you’re maintaining different product identifiers on both Amazon and Brightpearl platforms:
2. Accessing the Product Mapping Settings: Navigate to the product mapping settings in the connector (located on the left-hand side). Click on the 'download template' option at the top of the screen. (Refer to the attached image for guidance)
Path: Configuration Settings > Settings > Product Mapping
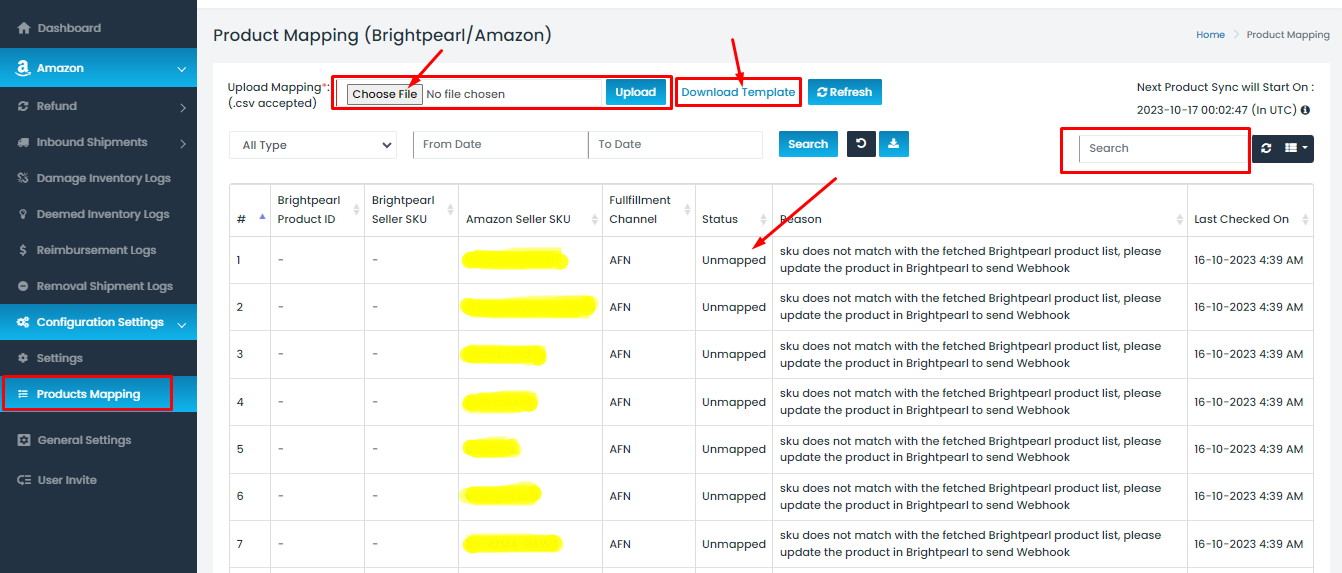
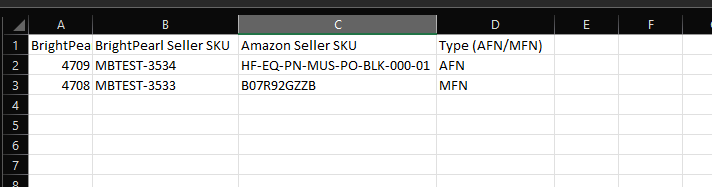
3. Using the Template for Mapping: An image attached below shows what the downloaded template looks like. It will contain fields such as Brightpearl Product ID, BP Seller SKU, Amazon Seller SKU, and Type. After uploading the completed template, products will be mapped. You can then use the search box to check a product’s status (mapped or unmapped) by searching with either Amazon's SKU value or Brightpearl SKU value. (Refer to the attached image for an example)
Please Note: Auto-mapping occurs only if the product identifier values are identical in both Amazon and Brightpearl. If the values differ, manual mapping using the provided template is required.
LOGS
This tab offers a comprehensive view of all data processed by the connector, including information about the source and destination of the data, its type, and the timestamp of the transfer. This information is useful for troubleshooting data transfer issues.
FILTERS
Various filters are available to help users sort and analyze data in the log table.
| Account | Shows the accounts that you have connected. |
| All status |
Specifies the status of the log entry, with different types of statuses:
|
| All refund/return type | Defines the type of refund/return, whether it is an FBA or FBM refund/return. |
| Date filter | It helps to search the data or Order ID using the date filter |
| Refresh | Useful for refreshing the logs when searching for specific data. |
| Export data | Allows downloading the details of the data in sheet form. |
| Resync all failed data | Useful when data has been modified and is ready to be synced again. |
| Search | Aids in searching for specific data. |
| All shipment | Indicates the type of shipment, whether it is an Inbound Shipment or a Dropshipment. |
| Discrepancy | Shows whether there is a discrepancy in quantity. |
| Resync all POs | Useful when a Purchase Order (PO) fails due to an invalid reason. |
| All transfers/ all adjustments |
|
Log table
Please see the details for the attached logs below
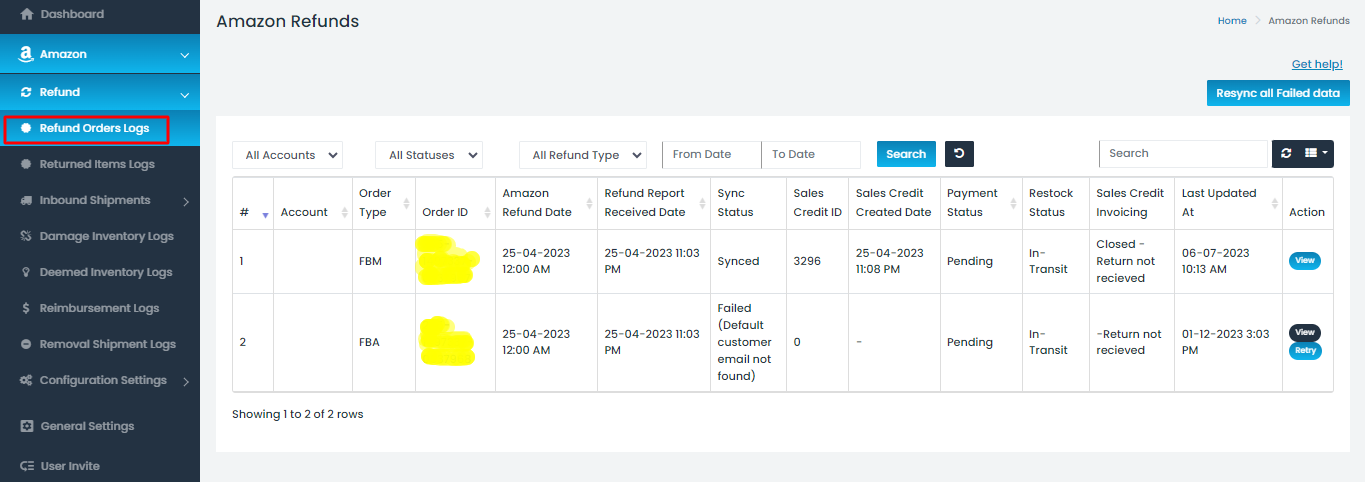
Refund Order Logs
|
Account |
It indicates the account to which the order belongs (from the connected accounts). |
|
Order type |
It specifies whether the order is Fulfilled by Amazon (FBA) or Fulfilled by Merchant (FBM). |
|
Order ID |
It displays the order number of the Sales Credit ID on Amazon. |
|
Amazon refund date |
It shows the date when the order is refunded to Amazon. |
|
Refund report received date |
It displays the date when the refund report is received. |
|
Sync status |
Specifies the status of the log entry. There are different types of statuses in a log:
|
|
Sales credit ID |
It denotes the Sales Credit ID number in Brightpearl. |
|
Sales credit created date |
It indicates when the sales credit is created in Brightpearl. |
|
Payment status |
It displays the payment status of the Sales Credit, whether it is ready, pending, or created. |
|
Restock status |
It shows the status of whether the item has been restocked or not. |
|
Sales credit invoicing |
It indicates the status of whether the sales credit has been invoiced or not. |
|
Last updated at |
It shows when the logs are updated for the particular Order ID. |
|
Action |
It provides two options: "View" and "Retry." "View" allows you to see the details, and "Retry" is useful when the order ID has been modified. |
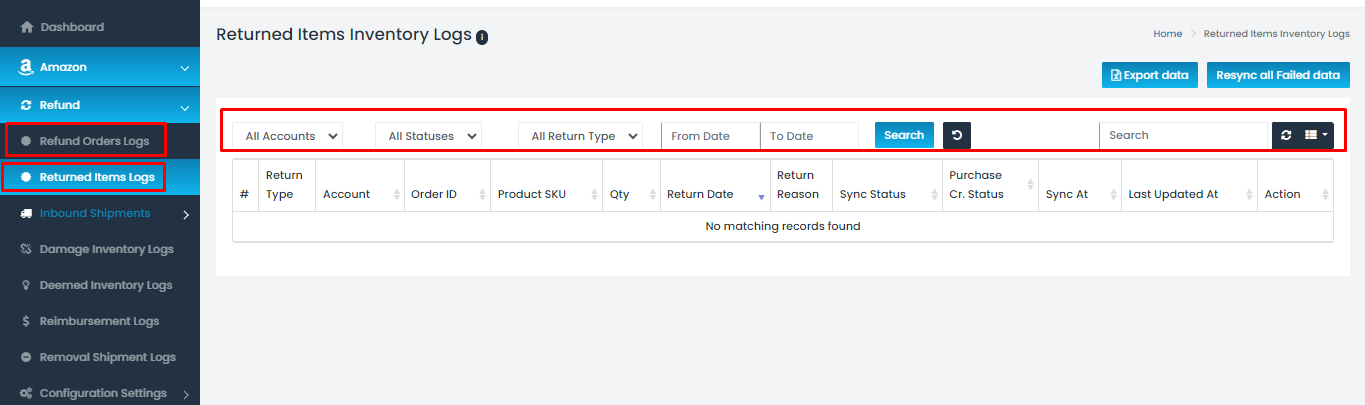
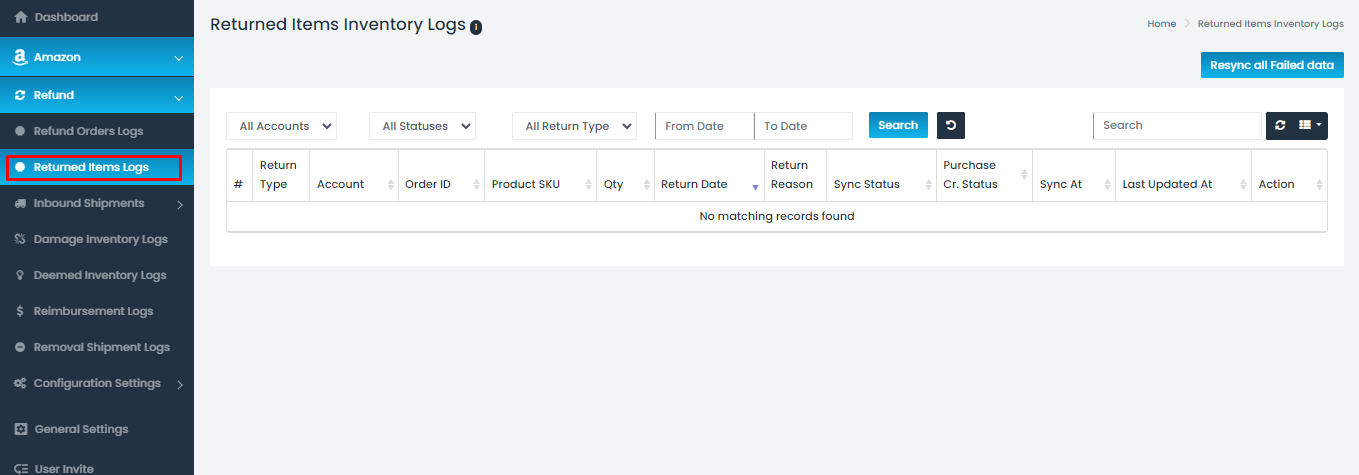
- Returned Item Logs
|
Return type |
This return type defines whether it is an FBA or FBM return. |
|
Account |
Indicates the account to which the return belongs (from the connected accounts). |
|
Order ID |
Displays the order number of the Sales Credit ID on Amazon. |
|
Product SKU |
The unique identifier ID assigned to a product while listing it in Brightpearl. |
|
Quantity |
Shows the quantity of items that were returned. |
|
Return date |
Shows the date when the item was returned. |
|
Return reason |
Defines the reason for returning the product, whether it is sellable or unsellable. |
|
Sync status |
Specifies the status of the log entry. There are different types of statuses in a log:
|
|
Purchase Cr. Status |
|
|
Sync at |
Shows the date and time when the order was synced. |
|
Last updated at |
Shows when the logs are updated for the particular Order ID. |
|
Action |
Provides two options: "View" and "Retry." "View" allows you to see the details, and "Retry" is helpful when the order ID has been modified. |
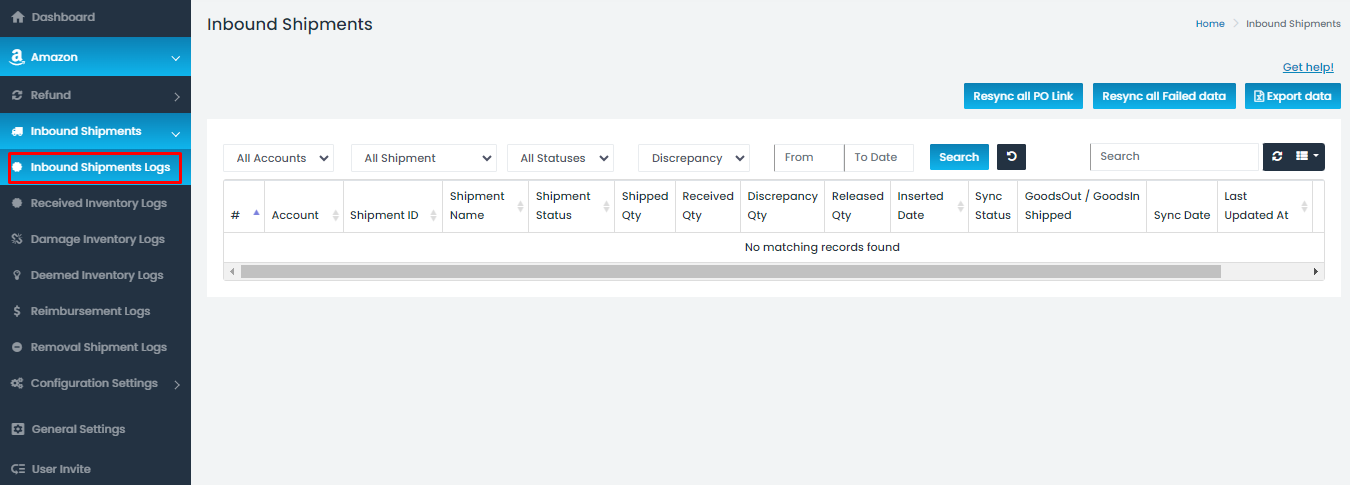
- Inbound Shipment Logs
|
Account |
Indicates the account to which the shipment belongs (from the connected accounts). |
|
Shipment ID |
A shipment ID is a unique code assigned to a package or group of items being sent or received. It facilitates tracking and management as the shipment moves from one location to another. |
|
Shipment name |
A shipment name is a recognizable or descriptive label given to a package or group of items. It aids in quickly identifying or referencing that specific shipment. |
|
Shipment status |
Shows the current status of the Shipment IDs. Various shipment statuses include Working, Ready-to-Ship, Shipped, Receiving, Cancelled, Deleted, Closed, Error, In Transit, Delivered, and Checked-In. |
|
Shipped quantity |
Displays the quantity of the shipped items. |
|
Received quantity |
Indicates the quantity of the received items. |
|
Discrepancy quantity |
Shows the quantity of items with discrepancies. |
|
Released quantity |
Displays the quantity of released items. |
|
Inserted date |
Indicates the date when something was added or put into the system. |
|
Sync status |
Specifies the status of the log entry. Different types of statuses in a log include:
|
|
Goods out/ Goods-in Shipped |
Indicates whether the Goods Out Note/Goods-In Note is created in Brightpearl or not. |
|
Sync date |
Shows the date when the shipment was synced. |
|
Last updated at |
Indicates the time when the logs were last updated for the particular Order ID. |
|
Action |
Provides two options: "View" and "Retry." "View" allows you to see the details, and "Retry" is helpful when the order ID has been modified. |
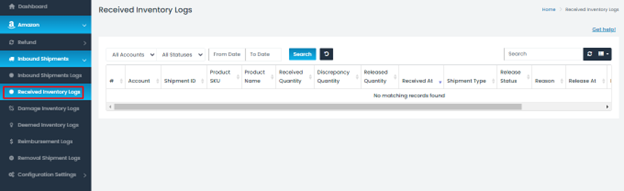
- Received Inventory Log
|
Account |
Indicates the account to which the inventory belongs (from the connected accounts). |
|
Shipment ID |
A shipment ID is a unique code assigned to a package or group of items being sent or received. It facilitates tracking and management as the shipment moves from one location to another. |
|
Product SKU |
The unique identifier ID assigned to a product while listing it in Brightpearl. |
|
Product name |
Displays the name of the product. |
|
Received quantity |
Shows the quantity of the received item. |
|
Discrepancy quantity |
Shows the quantity of items with discrepancies. |
|
Released quantity |
Displays the quantity of released items. |
|
Shipment type |
Indicates the shipment type, whether it is Dropship or Inbound shipment. |
|
Release Status |
Displays how much quantity has been released, pending, or failed:
|
|
Reason |
Displays the reason for a failed data transfer. |
|
Release at |
Displays the time and date when the inventory was released. |
|
Last updated at |
Shows the time when the logs were last updated for the particular Shipment ID. |
|
Action |
Provides two options: "View" and "Retry." "View" allows you to see the details, and "Retry" is helpful when the order ID has been modified. |
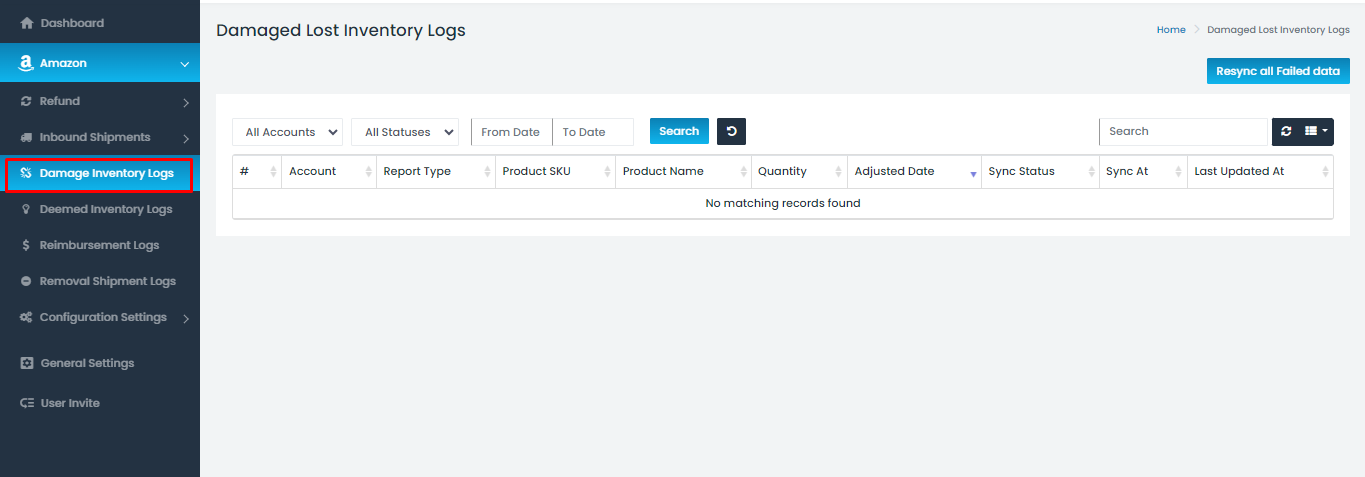
- Damaged Inventory Logs
|
Account |
Indicates the account to which the inventory belongs (from the connected accounts). |
|
Report type |
Displays the report type if it belongs to damaged or lost inventory. |
|
Product SKU |
The unique identifier ID assigned to a product while listing it in Brightpearl. |
|
Product name |
Displays the name of the product. |
|
Quantity |
Shows the quantity of the product that is lost or damaged. |
|
Adjusted date |
Refers to a date that has been modified or changed. |
|
Sync status |
Specifies the status of the log entry. Different types of statuses in a log include:
|
|
Sync at |
Shows the date when the inventory was synced. |
|
Last updated at |
Shows the time when the logs were last updated for the particular Order ID. |
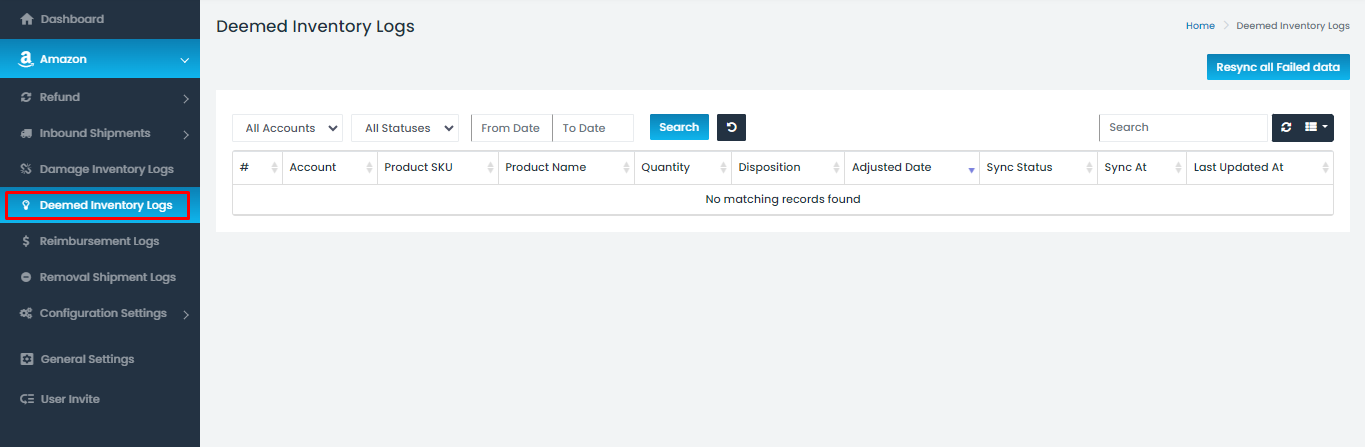
- Deemed Inventory Logs
|
Account |
Indicates the account to which the inventory belongs (from the connected accounts). |
|
Product SKU |
The unique identifier ID assigned to a product while listing it in Brightpearl. |
|
Product name |
Displays the name of the product. |
|
Quantity |
Shows the quantity of the product that is deemed as lost or damaged. |
|
Disposition |
Specifies the kind of product, whether it is defective or expired. |
|
Adjusted date |
Refers to a date that has been modified or changed. |
|
Sync date |
Shows the date when the inventory was synced. |
|
Sync at |
Shows the date and time when the inventory was synced. |
|
Last updated at |
Indicates when the logs were last updated for the particular Order ID. |
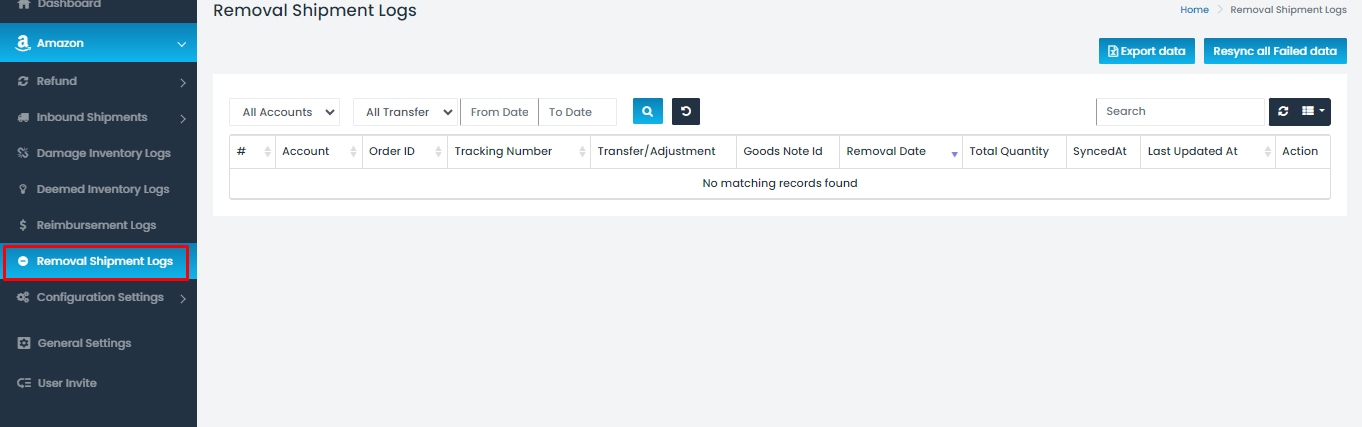
- Removal Shipment Logs
|
Account |
Indicates the account to which the shipment belongs (from the connected accounts). |
|
Order ID |
Displays the order number of the Sales Credit ID on Amazon. |
|
Tracking number |
Shows the tracking ID of the shipment. |
|
Transfer/adjustment |
Indicates whether the status of transfer or adjustment is completed. |
|
Goods note ID |
In the case of transfer, it shows the Goods-Out Note ID. |
|
Removal date |
Shows when the item was removed from Amazon. |
|
Total Quantity |
Displays how much quantity was removed. |
|
Synced at |
Shows the date when the inventory was synced. |
|
Last updated at |
Indicates when the logs were last updated for the particular Order ID. |
|
Action |
Provides two options: "View" and "Retry." "View" allows you to see the details, and "Retry" is helpful when the order ID has been modified. |
Invite User
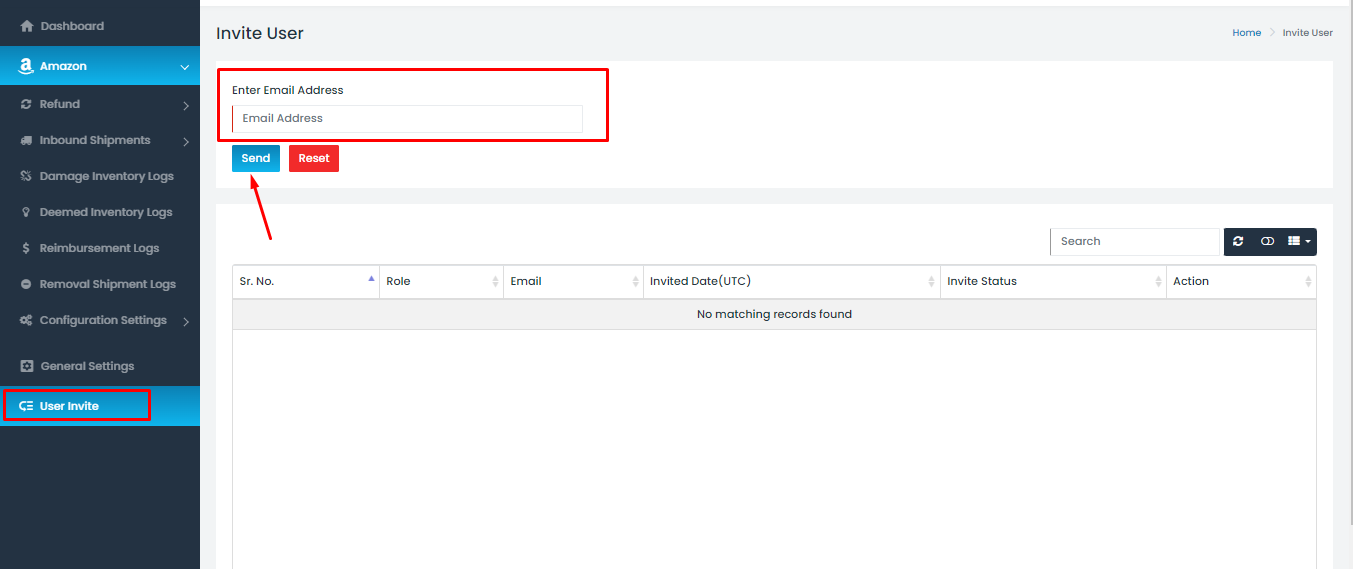
This menu allows admin users to grant access to the connector to other team members. This can be done by following the steps outlined below. Once a team member has been granted access, they will be able to use the connector to perform the same tasks as the original user, depending on the permissions.
The steps are as follows:
- Add the user's email address to the given "Email address" field, as shown in the image.
- Then send them an invite by clicking on the "Send" button. An invite will be sent to the user at the specified email address with the login credentials.
- With those login credentials, team members can access the connector.
FAQs
Q1) Are there any specific requirements for setting up the connector?
Ans. Yes, we'll need your Brightpearl sandbox account as well as your Amazon account for the setup. Once accounts are connected, we can go through the configuration settings together.
Q2) Is there any timeframe to complete the Configuration settings?
Ans. One week is enough to complete the Configuration settings, and if you have any questions, we're here to help. We can go through it together.
Q3) What data is synchronized between Amazon and Brightpearl?
Ans. We synchronize data for Sales credit with the help of Amazon settlement and return reports. Along with that, we also get details for Inbound and drop-ship through API endpoints. We also obtain information for Damaged/Lost, Deemed, and Removal shipments with the help of Amazon reports.
Q4) What is the difference between Inventory transfer/ Inbound Shipment or Dropship?
Ans. In the case of Inventory transfer, a Goods-Out note is created in Brightpearl and marked as Shipped when it is marked as Shipped by Amazon. In Dropship, a particular Purchase order is linked with the Shipment IDs, and receiving is reflected in the PO in Brightpearl.
Q5) Can the connector handle multiple Amazon stores or marketplaces?
Ans. Yes, we support multiple Amazon stores or marketplaces.
Q6) How often does the connector sync data between Amazon and Brightpearl?
Ans. We get data from Amazon's report once a day (Reports such as Settlement, Return, Damaged/Lost, Deemed, and Removal Shipment), and for Inbound shipments, we get details on an hourly basis with the help of API endpoints.
Q7) Is it possible to customize the synchronization settings?
Ans. Yes, it is possible, but first, we need to check if it is relevant and logical for all customers. Then we can decide on it.
Q8) Is real-time synchronization supported, or is there a delay in data updates?
Ans. We have a once-a-day sync for all the modules and every hour for inbound shipments.
Q9) Can the connector handle returns and refunds from Amazon in Brightpearl?
Ans. Yes, it handles both returns and refunds in Brightconnect logs from Amazon in Brightpearl.
Q10) What happens if there are discrepancies or errors in data synchronization?
Ans. If discrepancies or errors occur during data synchronization, our system is designed to detect and log such issues. Our team will be promptly notified, and we will investigate the root cause of the problem. Once identified, corrective measures will be taken to address the discrepancies and ensure accurate data synchronization. Users will be informed of any corrective actions taken, and we strive to resolve such issues efficiently to minimize any impact on operations.
Q11) Is technical support available for any issues related to the connector?
Ans. Yes, we provide technical support. You can connect with the concerned Project Manager for your queries.
Q12) Are there any additional costs associated with using the Amazon and Brightpearl connector?
Ans. It's essential to review our pricing and other information for any premium features or usage thresholds that may incur additional charges. We believe in transparent pricing, and our sales team is available to clarify any questions related to costs and ensure a clear understanding of the pricing structure.