Configuration Setup of Brightpearl and WooCommerce to ESB App
The sync configuration page allows you to control and manage the configuration of various data types between WooCommerce and Brightpearl.
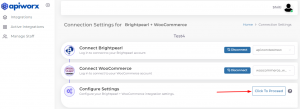
1. Step 1: Click on “Configure Setting”.
Note: Click the "Proceed" button to fetch data from Brightpearl and WooCommerce.
2. Open the field mapping page and map all required fields one by one.
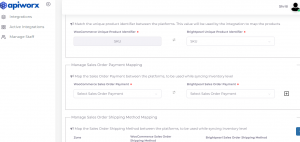
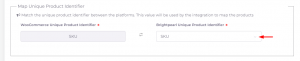
3. Map Unique Product Identifier: Map the unique product identifier between Brightpearl and WooCommerce. Here, you can map your Brightpearl and WooCommerce SKUs by selecting the values from the dropdown menu.
4. Sales Order Payment Method: Map the sales order payment method between Brightpearl and WooCommerce. Here, you can map your Brightpearl and WooCommerce sales order payment methods by selecting the values from the dropdown. If you want to add more than one payment method, click on the “+” button.
- Purpose of Payment Method Mapping: This mapping ensures that when an order is synced from WooCommerce to Brightpearl, the order created in Brightpearl will have the same payment method applied as mapped to the WooCommerce payment method.
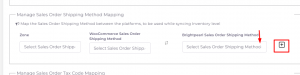
5. Map the Sales Order Shipping Method between Brightpearl and WooCommerce. Here you can map your Brightpearl and WooCommerce sales order shipping methods by selecting values from the dropdown. To add more than one shipping method, click on the “+” button.
- Purpose of Shipping Method Mapping: This mapping ensures that when an order is synced from WooCommerce to Brightpearl, the order created in Brightpearl will have the same shipping method applied as mapped to the WooCommerce shipping method.
6. Map the Price List between Brightpearl and WooCommerce. Here you can map your Brightpearl and WooCommerce price lists by selecting values from the dropdown. To add more than one price list, click on the “+” button.
- Purpose of Price List Mapping: This mapping ensures that when a product is synced from WooCommerce to Brightpearl, the product created in Brightpearl will have the same price list applied as mapped to the WooCommerce price list.

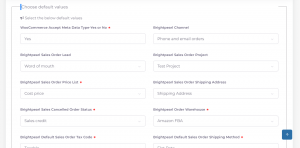
7. Choose Default Values for Order Creation in Brightpearl from WooCommerce:
- Channel: Select the Brightpearl channel where you want your WooCommerce order details uploaded.
- Project: Choose the project’s status, such as testing period or going live.
- Lead Source: Select a lead source for this connector, like word of mouth or Google.
- Price List: Set a default price list for creating orders in your selected WooCommerce location.
- Tax Code: Choose a unique Tax Code for contact records, product records, and transactions. This controls the total tax rate applied to a transaction.
- Warehouse: Select a default warehouse for creating orders in your selected WooCommerce warehouse.
- Shipping Address: Set the default shipping address to show in Brightpearl when creating a shipment for a sales order.
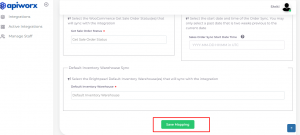
- Canceled Order Status: Define the Brightpearl status for orders canceled in WooCommerce.
- Shipping Method: Set a default shipping method to show in WooCommerce from Brightpearl when creating an order.
- Default Payment Method: Set a default Brightpearl payment method for order payments synced from WooCommerce, and map other payment methods between both platforms as preferred.
8. Get Order Status: Select the WooCommerce order status to sync orders with that status into Brightpearl. You can select more than one status.
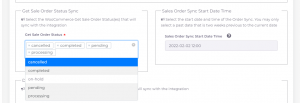
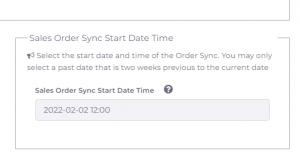
9. Sales Order Sync Date-Time: Set a Start Date and Time for order syncing. Note: Only a past date, up to two weeks prior to the current date, can be selected.
11. After mapping, click on the “Save Mapping” button.