Seamlessly Connecting DSCO with Brightpearl for Optimized Order and Inventory Management
Getting Started: Connecting BrightConnect with Your Brightpearl
To integrate Brightpearl with your system, obtaining permission is the first step. Follow these simple instructions to connect your personal portal with Brightpearl:
Access General Settings in BrightConnect
- Navigate to the General Settings of BrightConnect, enter your Brightpearl Account code, and click on the "Connect" button.
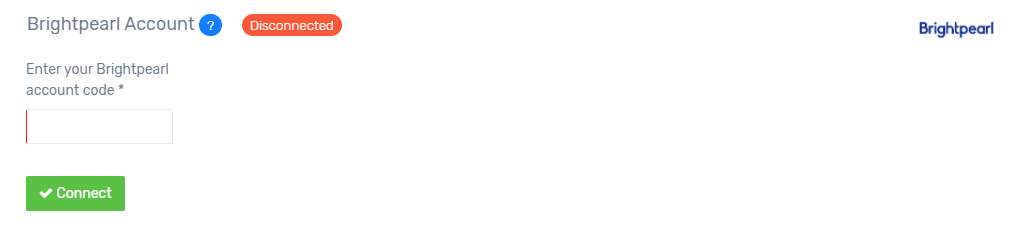
This action will redirect you to the Brightpearl login page. Log in if you are not already logged in.
Log into Brightpearl
2. Use your credentials to log into Brightpearl.
Grant Access to BrightConnect
3. Click on “Approve” to allow BrightConnect access to your Brightpearl data.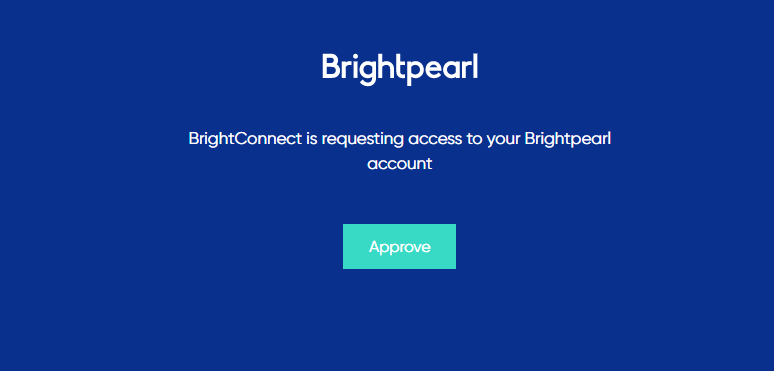
After approval, you will be redirected back to BrightConnect’s General settings page, where a success message will be displayed.
Complete the Connection Process
4. Click on the second button, as illustrated below, to finalize the connection process.
Once Brightpearl is connected, our system will begin retrieving all necessary data from Brightpearl and will notify you via email once the process is complete. To proceed, you will need to configure the synchronization settings by going to the Settings page of BrightConnect.
Connecting BrightConnect with DSCO
To integrate DSCO with BrightConnect, obtaining permission is the first step. Follow these simple instructions to establish a connection with DSCO:
Access Your DSCO Account
Log In to the BrightConnect Portal
2. Access the BrightConnect portal using your login credentials.Navigate to API Settings
3. In the BrightConnect portal, use the left sidebar menu to go to “Settings” and then select “API Settings.”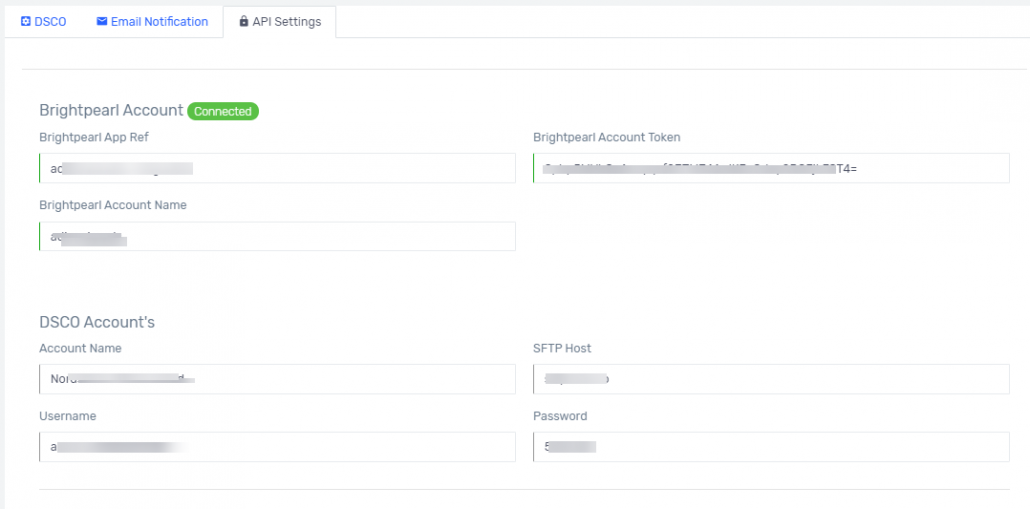
Enter DSCO API Credentials
4. Provide your DSCO API Credentials in the designated fields and click "Save" to complete the process.
With these steps completed, BrightConnect is now successfully connected with DSCO.
Getting Started with DSCO Brightpearl Connector
BrightConnect enables the integration of Brightpearl and DSCO, boosting your productivity significantly. Sync purchase orders from DSCO to Brightpearl for sales, and synchronize shipment, inventory, and invoices back to DSCO from Brightpearl.
Account Setup
1. Email us at contact@apiworx.com to set up an account.Account Creation
2. Once your account is created, you will receive an email with login details. Log into the Portal and navigate to the settings page to configure your integration.
Connect API
- How to obtain Brightpearl API keys and connect them?
- How to obtain DSCO API Keys and connect them?
DSCO Settings

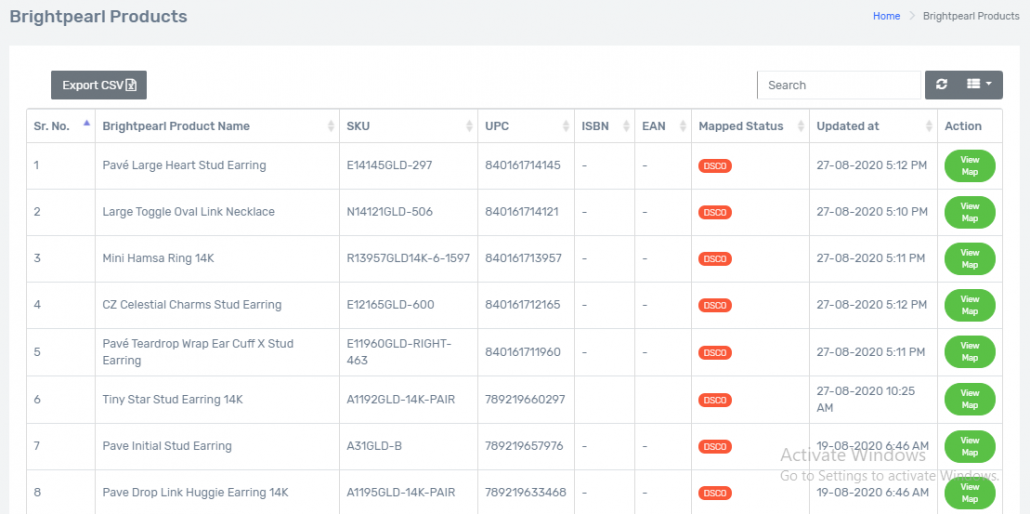
Match Brightpearl Products to DSCO Items

If you're not maintaining Unique IDs between platforms, don't worry. Our BrightConnect app allows manual mapping of products between platforms as well. See here for more details.
Enable/Disable Inventory Sync

Order Settings
7. In the Order tab, select a default order status that will be used when creating sales in Brightpearl.
Set Default Values for Sales Creation
8. Determine the default values that the system will use while creating sales in Brightpearl.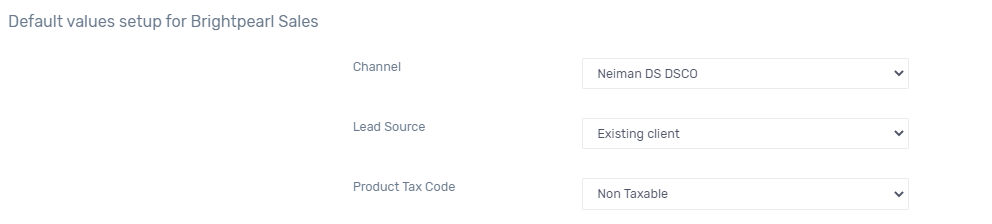
Map Shipping Methods
9. Configure the mapping of shipping methods between the platforms. This ensures the system synchronizes the correct value of the accepted shipping method in DSCO when syncing shipments. For convenience, use the Bulk Upload button in the settings to upload DSCO's acceptable shipment methods in advance and map them with Brightpearl.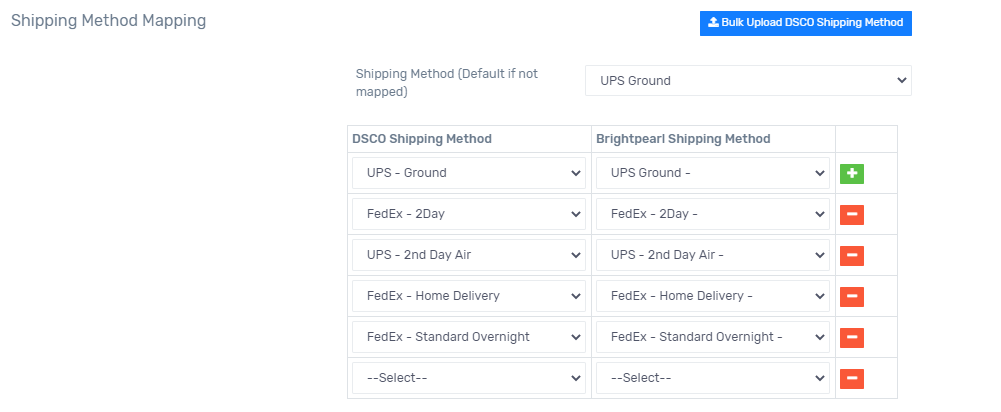
Map Warehouses
10. Set up the mapping of warehouses between the platforms so that the system correctly syncs the warehouse values in DSCO. Utilize the Bulk Upload button in the settings to upload DSCO warehouses in advance and map them with Brightpearl.
Set Order Shipment Sync Triggers
11. Choose from two types of triggers for synchronizing order shipments from Brightpearl to DSCO, providing flexibility to align with your business process.
- Sales Order Status Update: Select this trigger to specify a status at which the integration should initiate the synchronization of shipments to DSCO.
- Goods Out Note Created: When this trigger is selected, the integration will start syncing shipments to DSCO whenever a Goods Out note is created against a sales order in Brightpearl. (Note: Partial Goods Out notes are not currently supported.)

Set Default Status for Order Cancellation Sync
12. Configure the default sales status for synchronizing order cancellations from DSCO to Brightpearl.
Completion: Your BrightConnect configuration is now complete and ready to start syncing. For any inquiries or assistance, please email us at contact@apiworx.com.
How to Map Items Between Platforms?
In the Settings, you have the option to match products between DSCO and Brightpearl using their unique IDs. Select a field from both platforms where you store the unique ID of your product or item. The system will automatically use this field for mapping.
What if some of your items don't have a unique key? No problem! We also provide an option for mapping those items according to your requirements.
The Item Mapping page enables you to view all items, perform mappings, and update these mappings as needed.
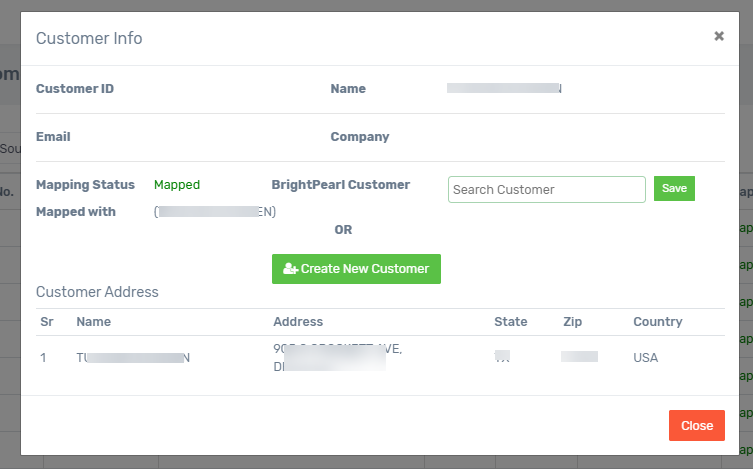
How to Map Customers Between Platforms?
BrightConnect enables automatic creation of customers associated with orders from DSCO through our settings.

If you prefer not to use the automatic creation feature, no problem! We offer the option to manually map customers as well. This can be done through the Customer Mapping page, where you can map customers and even create new ones in Brightpearl with just a few clicks.