A Comprehensive Guide to Integrating OnBuy Marketplace with Brightpearl Using BrightConnect
Once enabled, complete the following steps:
a) Set the trigger for Shipment Sync. There are two types of triggers available, providing flexibility to suit your business process:
Instructions to Get Started with OnBuy & Brightpearl Connector
BrightConnect enables the connection between Brightpearl and OnBuy Marketplace, enhancing your productivity significantly.
Effortlessly synchronize products, inventory levels, orders, and shipment updates between Brightpearl and OnBuy.
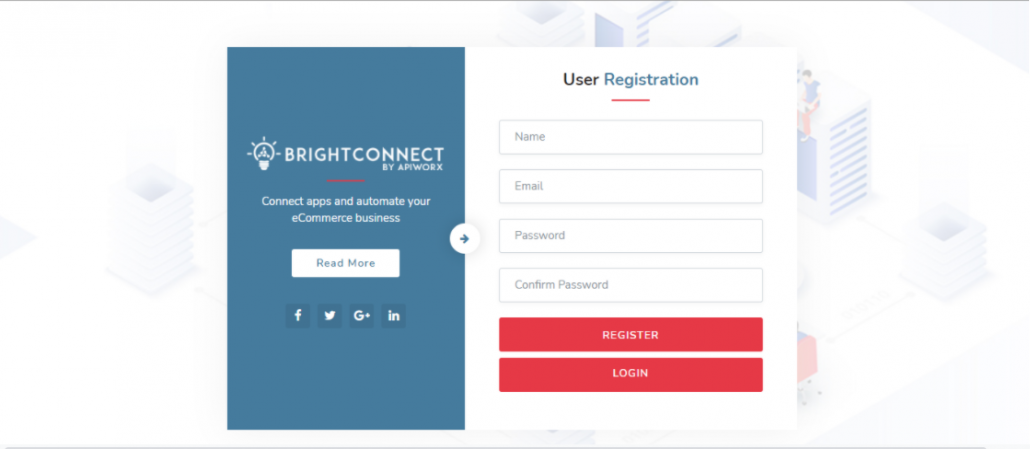
- Register by entering your basic details such as name, email, and password to set up an account.
2. After registration, obtain the API details from Brightpearl and enter them in step 1, as shown in the example screenshot. Click on the 'Connect' button to validate and connect Brightpearl.
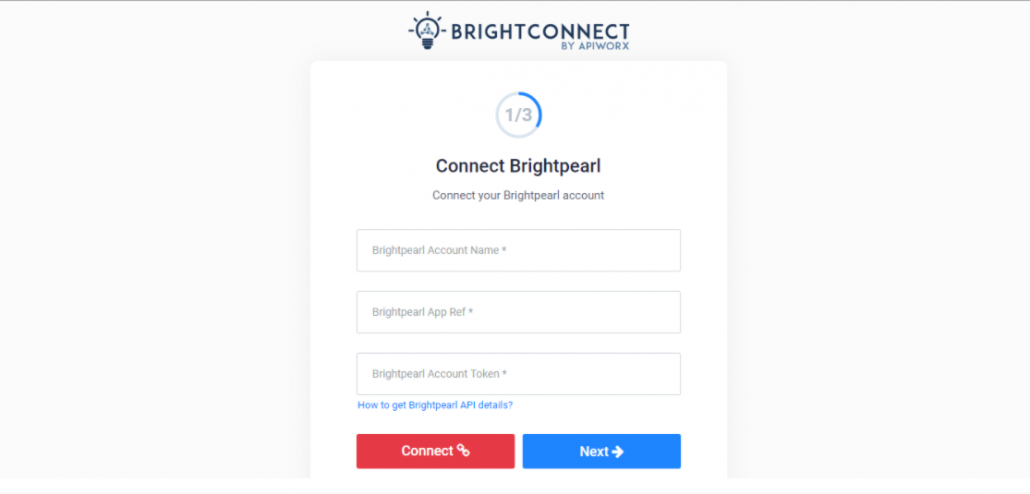
For guidance on obtaining Brightpearl API keys and connecting them, see here.
3. Acquire the API details from OnBuy and input them in step 2. Click on the 'Connect' button to validate and connect Brightpearl with OnBuy.
For instructions on obtaining OnBuy API keys and connecting them, see here.
4. You will have the option to choose whether to sync all products from Brightpearl to OnBuy or only a selection of filtered products. At this stage, the system begins fetching product data from Brightpearl using the filters you've selected, preparing it for synchronization with OnBuy.
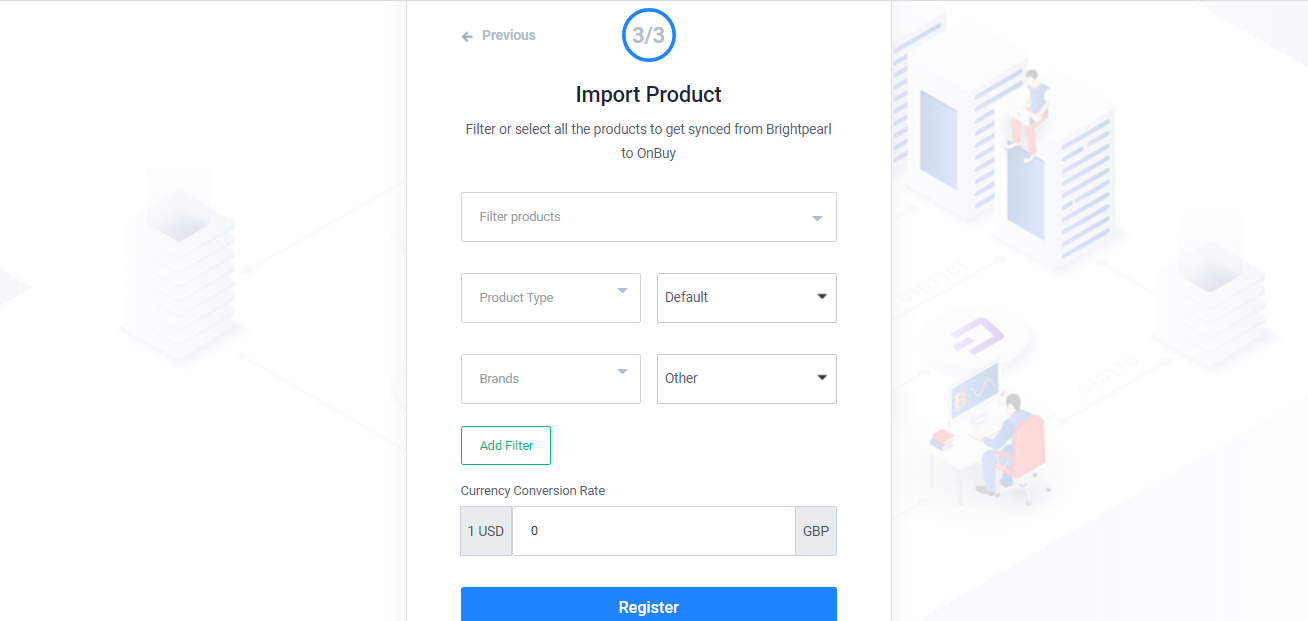
You can choose from three options available in the 'Import Product' step – 'All Products', 'Live Products from Brightpearl', or filter the products by brands, categories, vendors, and/or product types.
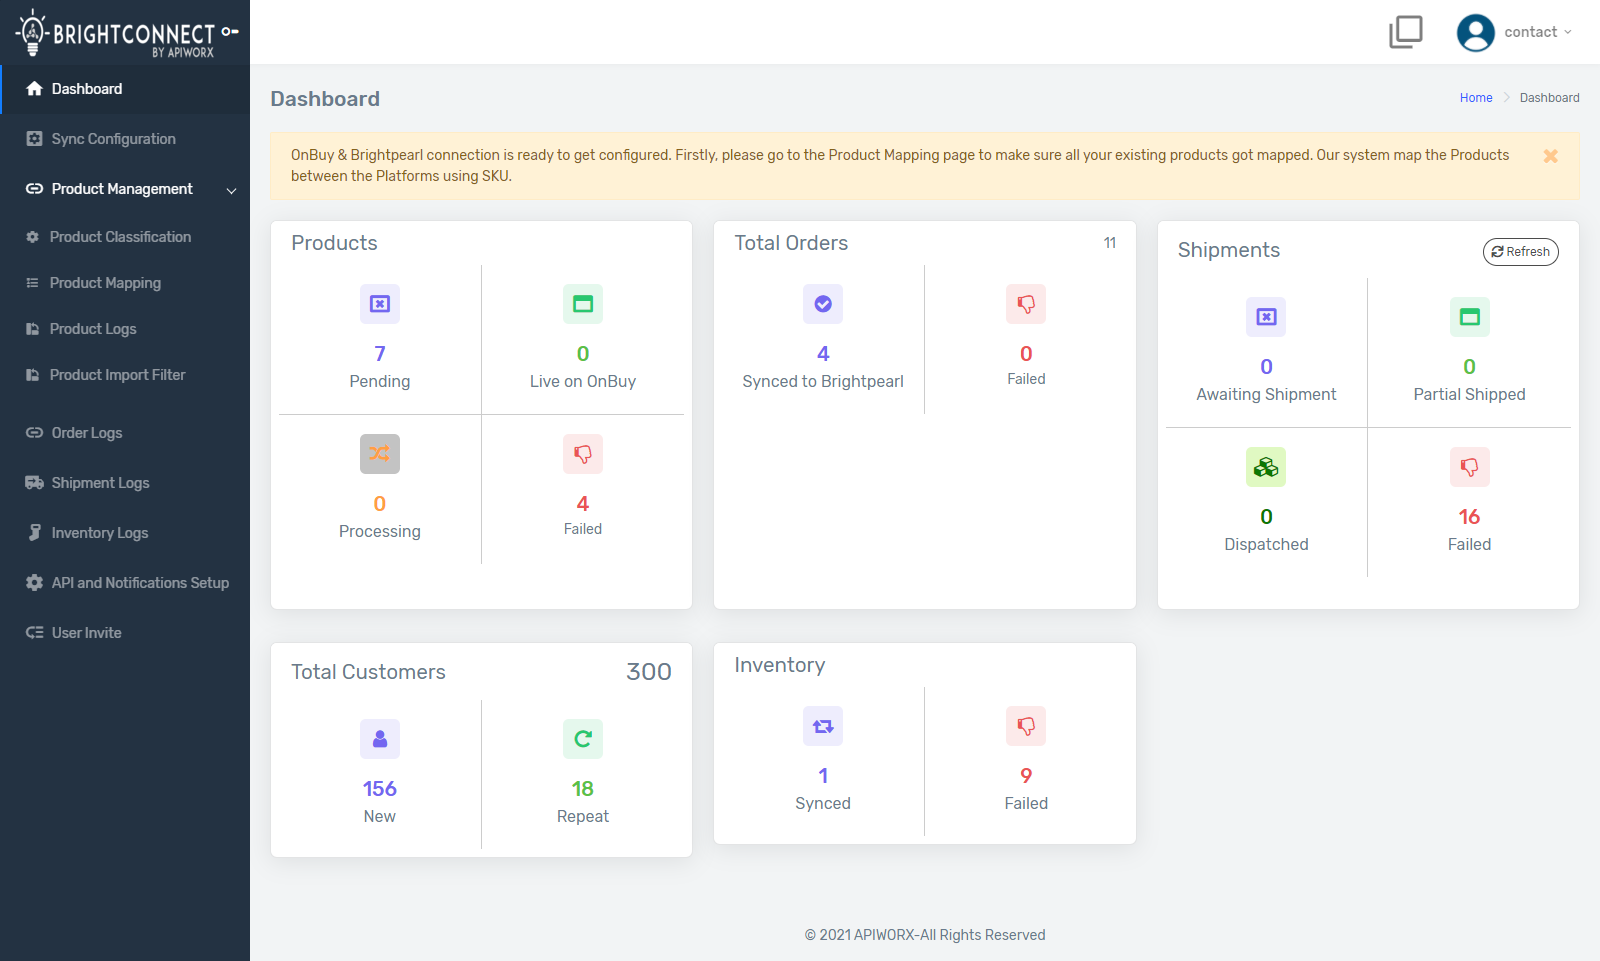
You have completed the initial registration process and will be redirected to the Dashboard.
The Dashboard will display an alert indicating that data synchronization is underway to prepare the system for configuration.
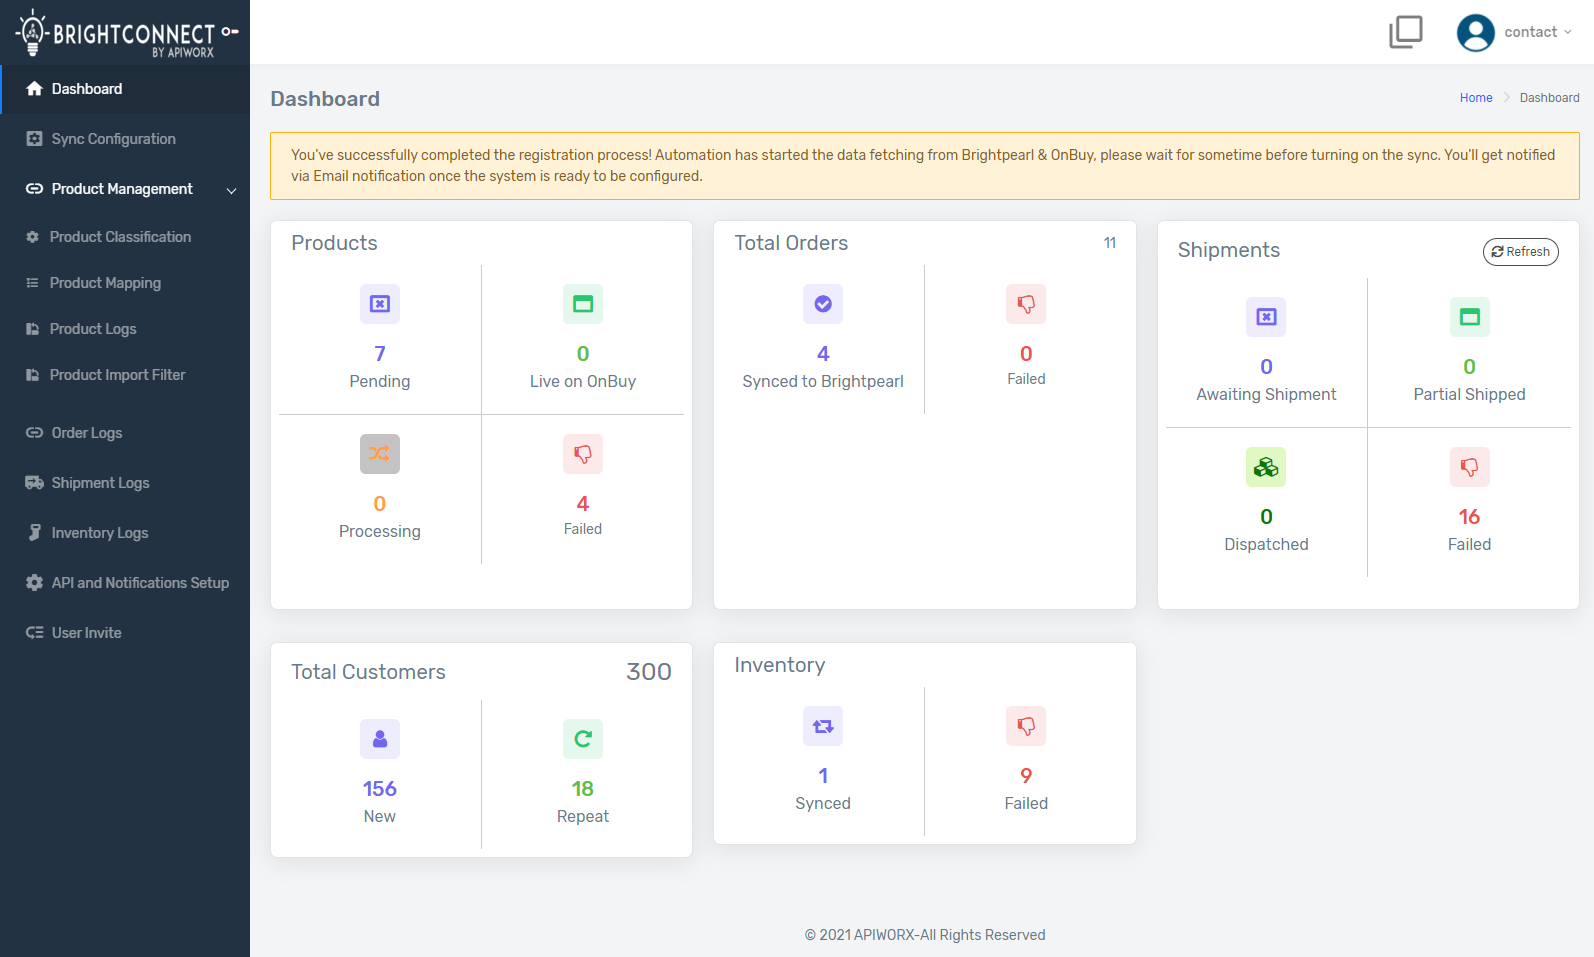
Once this process is complete, users will be notified via email to return to our portal and begin the configuration process. After this, the alert will be removed from the Dashboard, and you can proceed to the next step.
5. Navigate to the Product Mapping page and review the mapping status of all your products. If there are products whose SKUs do not match between platforms, you can upload their mappings on this page. For full details, review this article.
6. After mapping all existing products between the platforms, visit the Sync Configuration page to enable synchronization of products, orders, prices, inventory, and other elements as needed. See full details in this article.
7. Visit the Product Classification page to ensure that new products from Brightpearl are synced to OnBuy with the correct category, price, inventory level, and other information. For comprehensive guidance, refer to this article.
Once the above process is completed, you can review the synchronization status of data on the Logs pages within BrightConnect. Our system sends a comprehensive email report daily, which provides a summary of successfully synced data and any failures, along with their reasons.
How to Obtain Brightpearl API Keys for BrightConnect Integration?
To facilitate integration with Brightpearl, you will need to retrieve API details from your Brightpearl account. Follow these straightforward steps to obtain the API keys from Brightpearl:
- Log in to your Brightpearl account.
- Navigate to the “App Store” in your account.

3. Proceed to the “Private Apps” tab.

4. Click the “Add private app” button.

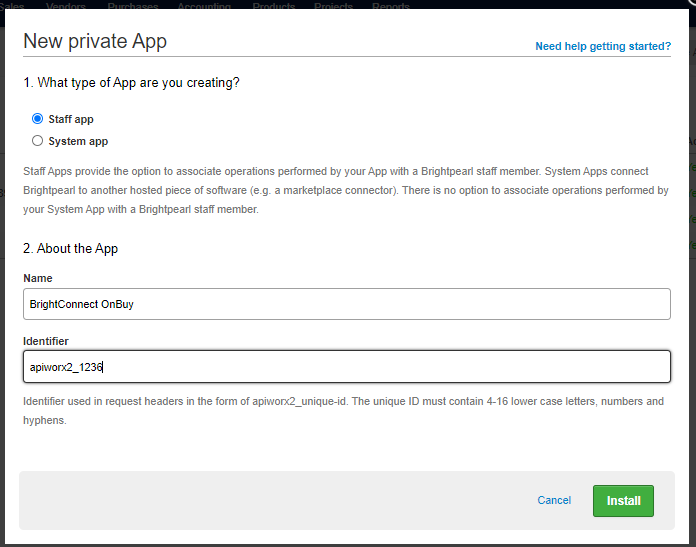
5. A pop-up will appear where you need to select the App type as “Staff app”. Enter a memorable name for the app and add an identifier. After filling out all information, click the “Install” button.
6. A success message will appear, and you will see the reference and token displayed in the table columns as shown.

7. Copy the Reference and Token from there. Use them along with your Brightpearl Account code (the one used to log into Brightpearl) to insert them into your API Settings page.
How to Obtain OnBuy API Keys for BrightConnect Integration?
To initiate synchronization between your OnBuy Seller account and Brightpearl, you must first acquire the API keys from your OnBuy Seller account and then connect them with BrightConnect.
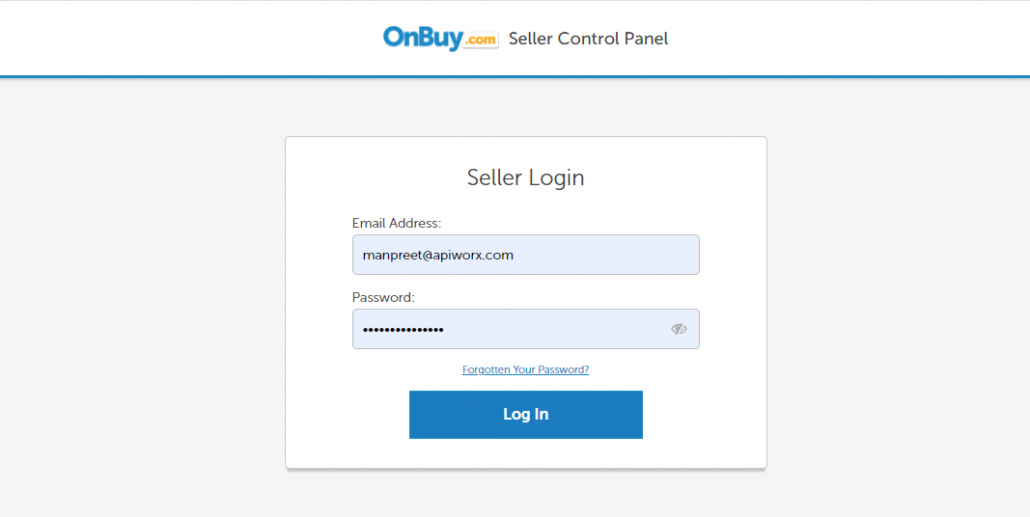
- Log in to your OnBuy Seller account.
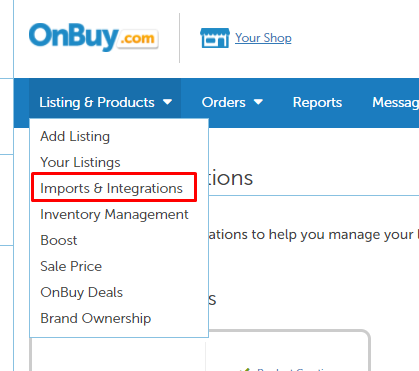
2. Navigate to the 'Listing & Products' Menu. Click on 'Imports & Integrations'.
3. Scroll down to 'Available Integrations', locate the OnBuy API box, and click on it.
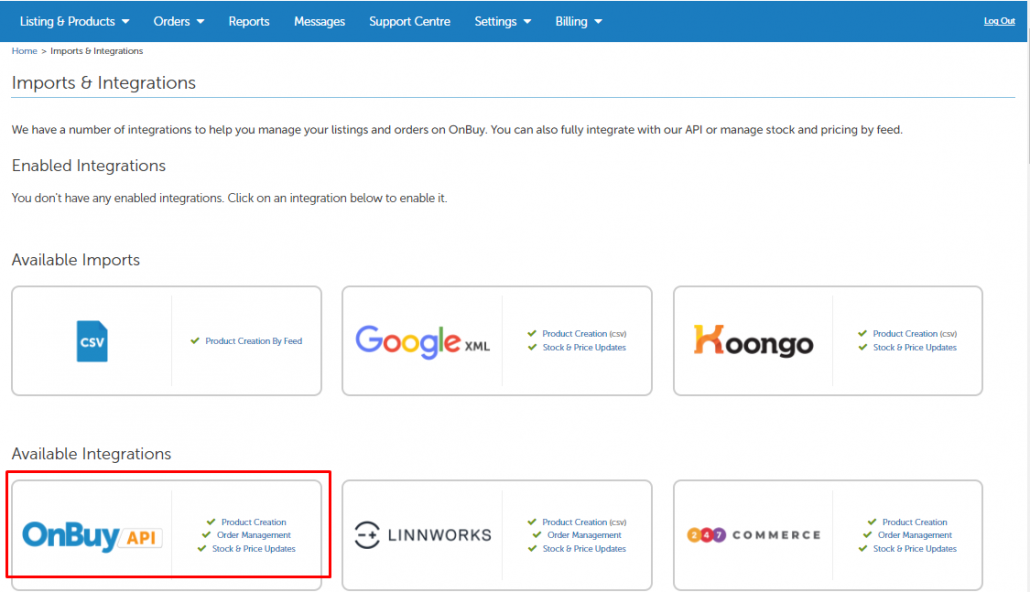
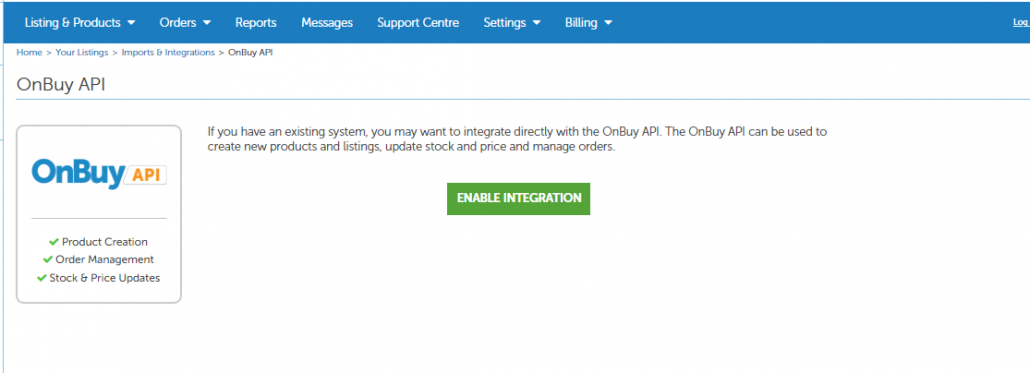
4. You will be redirected to a page where you should click the 'Enable Integration' button to access the API keys.
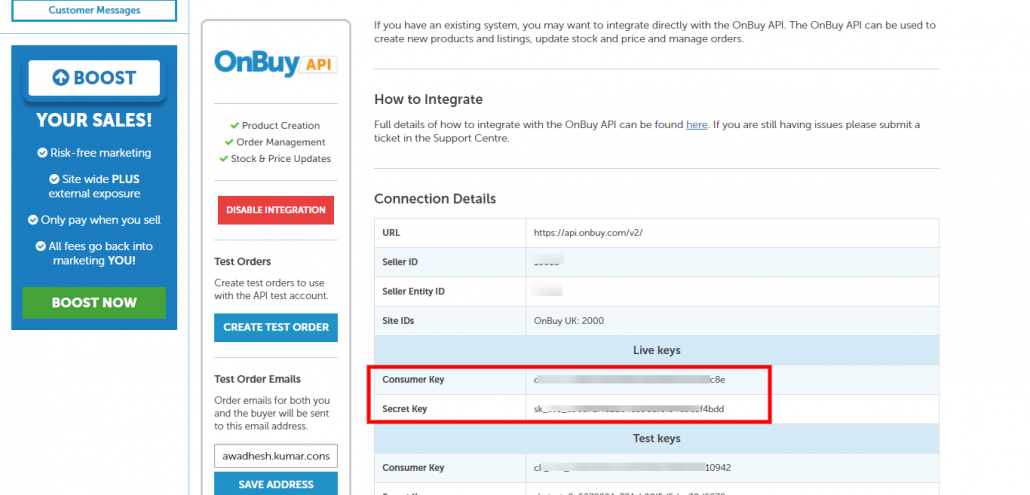
5. Now you will be able to see the Live Keys. Please use the Consumer Key and Secret Key, as highlighted below, to connect OnBuy with BrightConnect during the registration process or at a later stage when editing your OnBuy connection.
Managing Product Mapping Between Brightpearl and OnBuy
BrightConnect’s OnBuy Connector utilizes SKU as a unique identifier between the platforms to match existing products and link new ones.
The Product Mapping page enables you to map products between Brightpearl and OnBuy that do not have matching SKUs. Products with the same SKU in both platforms will be automatically mapped.
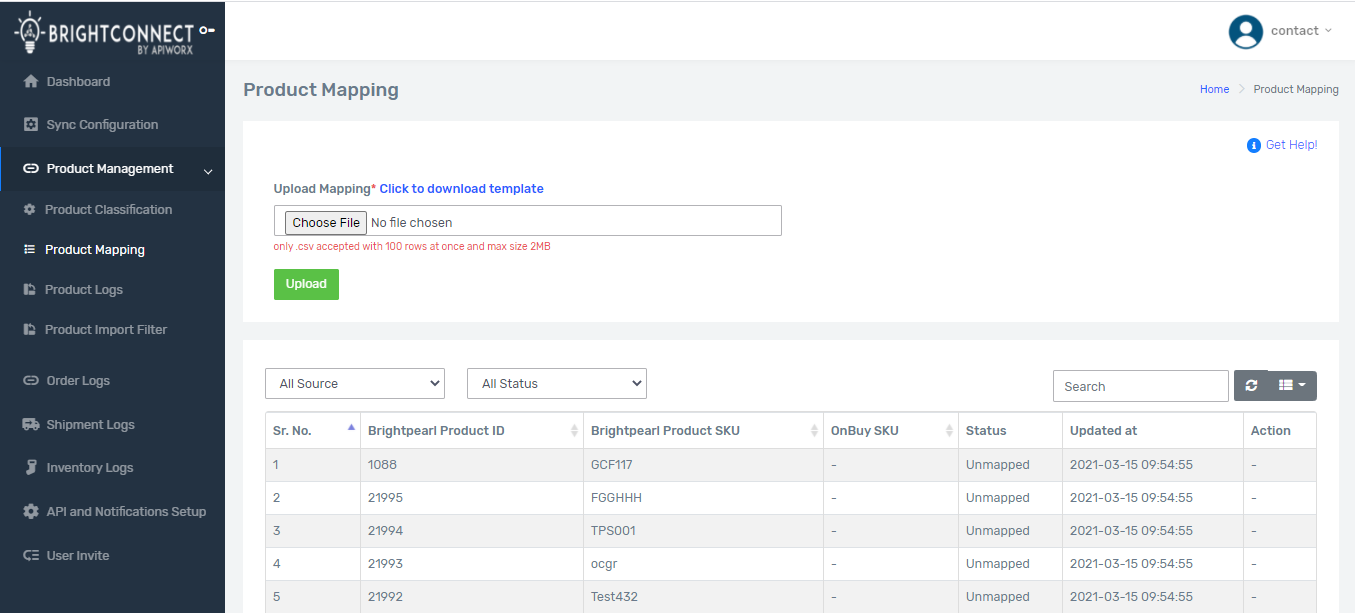
1. Use the filter above the table to identify unmapped Product SKUs. Review these unmapped products before proceeding to the next step.

2. Click the 'Download Template' button to obtain a template (.CSV file) and enter the SKU data from both platforms that need to be matched and are currently unmapped.
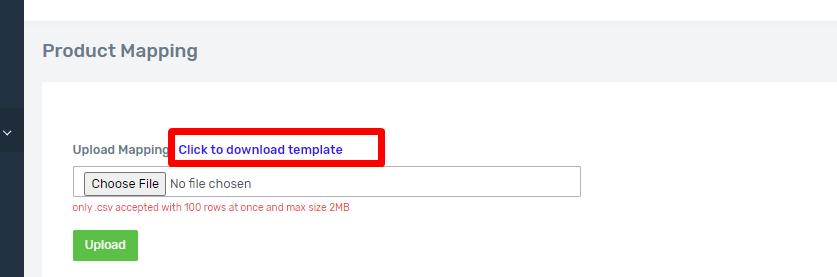
3. Upload the completed file back to the portal by clicking 'Choose file', then click the 'Upload' button.

Note: Currently, a maximum of 100 SKU mappings can be uploaded at once, so your CSV file should contain only 100 rows of SKUs. If you have more than 100 SKUs to map and upload, please divide them into two or more files and repeat the upload process for each file.
How to Configure Sync for the OnBuy Connector?
The Sync Configuration page allows you to control and manage the synchronization of various data between OnBuy and Brightpearl.
- Access the Sync Configuration page.
- (Product Sync Management) – Under the Products tab, enable Product synchronization if you wish to sync new products from Brightpearl to OnBuy.
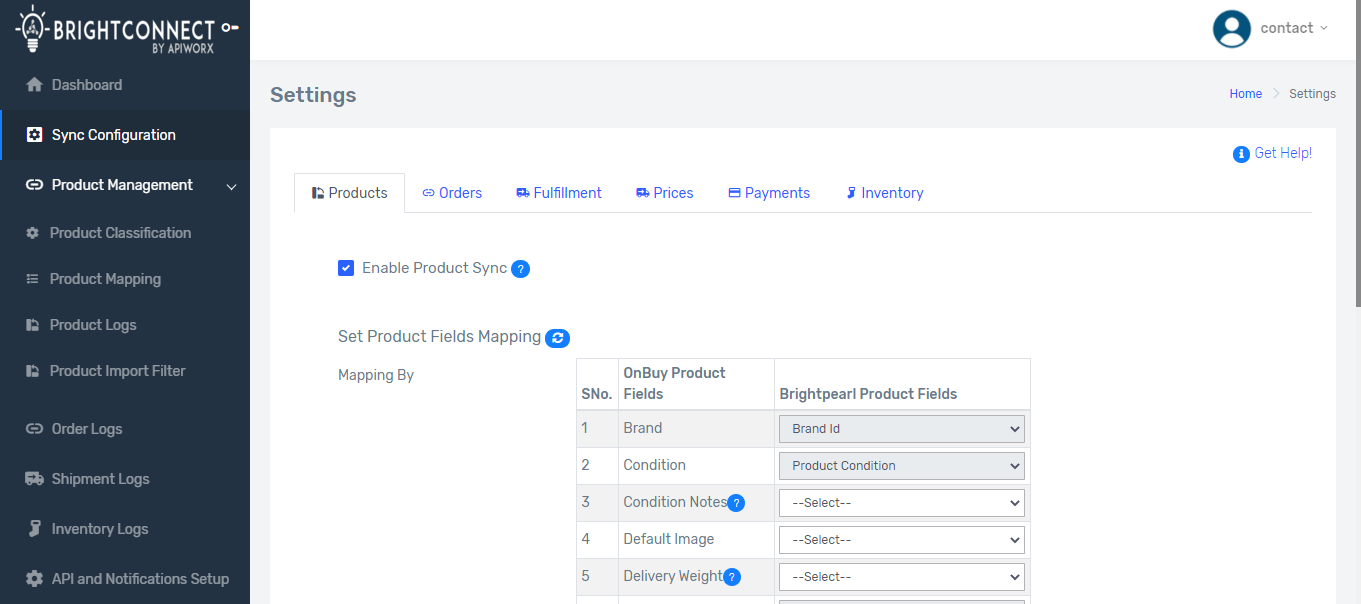
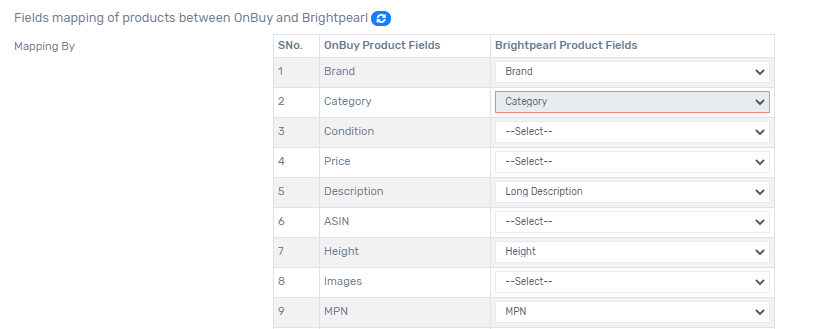
Once Product sync is enabled, review and adjust the Product field mapping according to your product setup on both platforms.
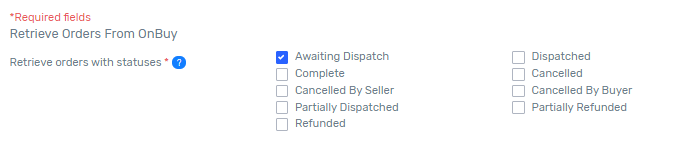
3. (Order Sync Management) – Navigate to the Orders tab to enable the synchronization of orders from OnBuy to Brightpearl.
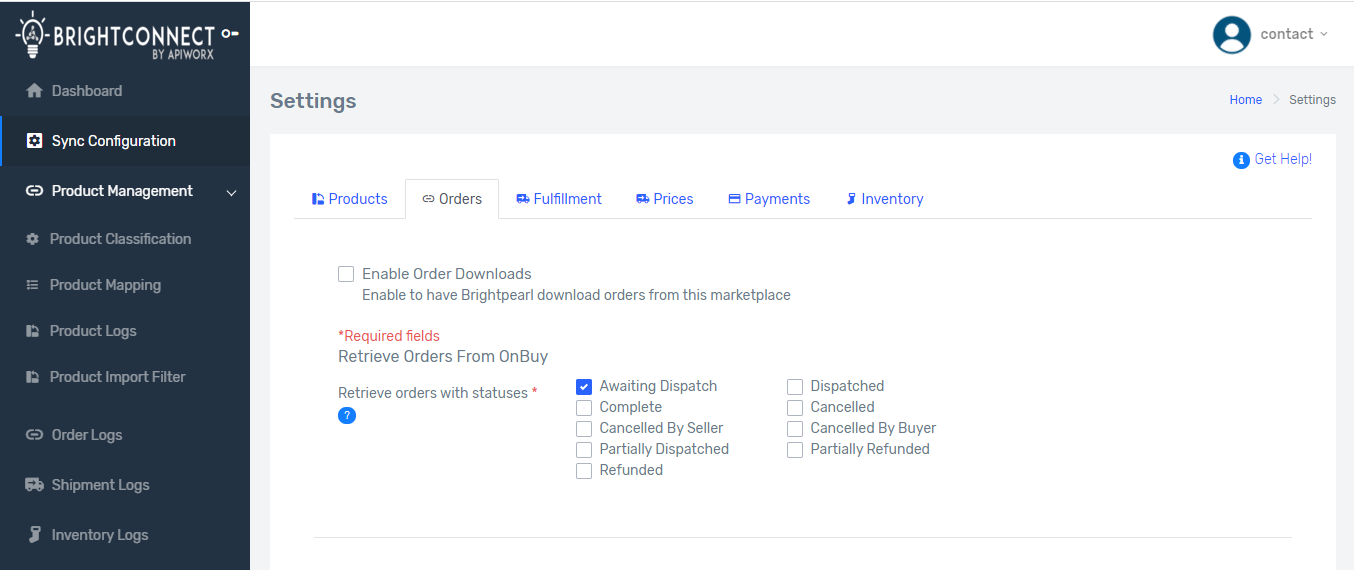
Once enabled, you'll need to:
a) Choose the OnBuy Order statuses that will trigger the synchronization of orders to Brightpearl.
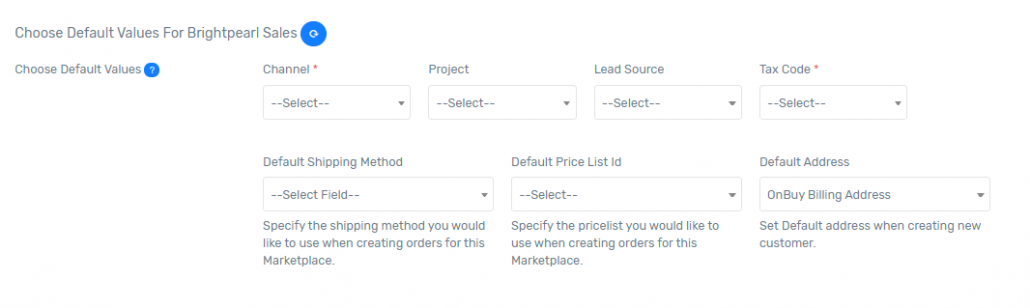
b) Define default values which the system will use to create Sales Orders in Brightpearl from OnBuy.
c) Select a Brightpearl Warehouse for the automation to reserve inventory for Sales Orders.

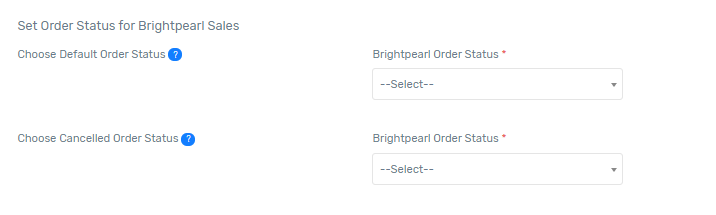
d) Set a default status for Brightpearl Sales Orders originating from OnBuy and select the Brightpearl status used for marking orders as Cancelled. This ensures two-way synchronization of cancellation status, allowing our system to trigger cancellation syncs from Brightpearl to OnBuy and vice versa.
e) Choose a Brightpearl Sales Order custom field to sync OnBuy Order fee details.

4. (Fulfillment Sync Management) – Navigate to the Fulfillment tab to enable the synchronization of Fulfillment/Shipment from Brightpearl to OnBuy.
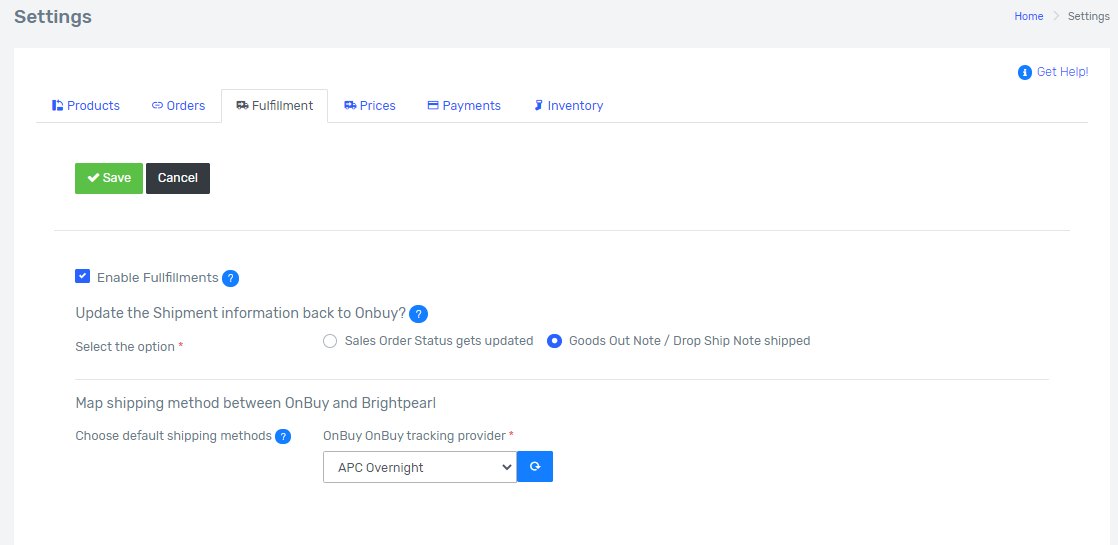
Once enabled, complete the following steps:
a) Set the trigger for Shipment Sync. There are two types of triggers available, providing flexibility to suit your business process:

Option 1 – Sales Order Status Update: If this trigger is selected, you will need to select a status at which you want the integration to initiate the synchronization of Shipment/Fulfillment information into OnBuy, along with selecting an Order field from which the automation will pick the tracking information.
Option 2 – Goods Out Note/Drop Ship Note Shipped: If this trigger is selected, the integration will initiate the synchronization of shipment information to OnBuy (only for orders sourced from OnBuy) whenever you create and mark a Goods Out note or Drop Ship note as shipped against a sales order.
b) Set a default Shipping Method for synchronization to OnBuy

Choose a default Shipping method to be used by the system whenever a shipment from Brightpearl has a blank Shipment method. If Brightpearl's Order/Goods-Out note contains a Shipment method, our system will send that name as is to OnBuy.
5. (Price Sync Management) – Navigate to the Prices tab to enable the synchronization of prices from Brightpearl to OnBuy and update the currency conversion rate if required.
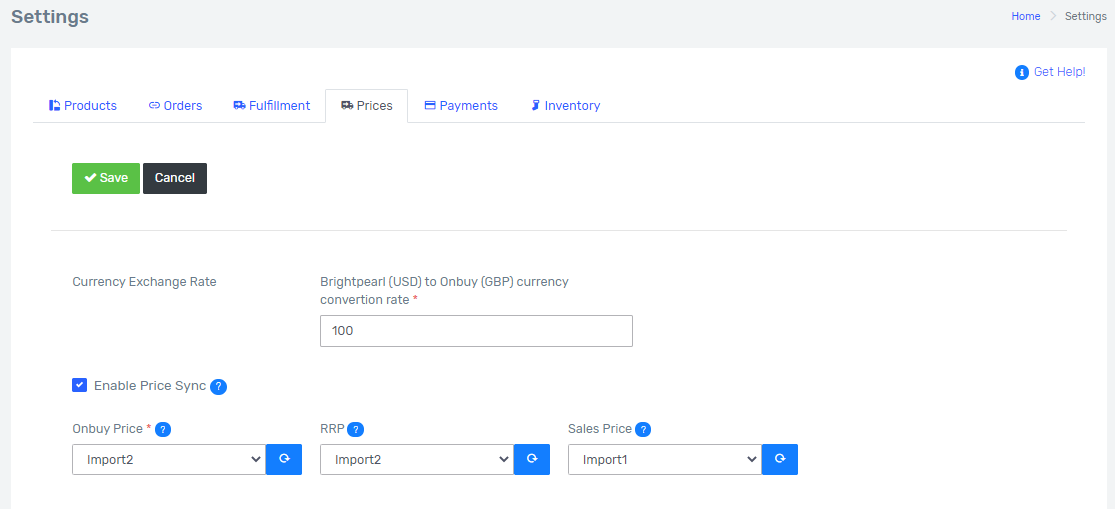
Once enabled, you will need to select the Brightpearl Price lists that you maintain for various types of OnBuy product prices.

6. (Payment Sync Management) – Move to the Payments tab to enable the synchronization of payments from OnBuy to Brightpearl.
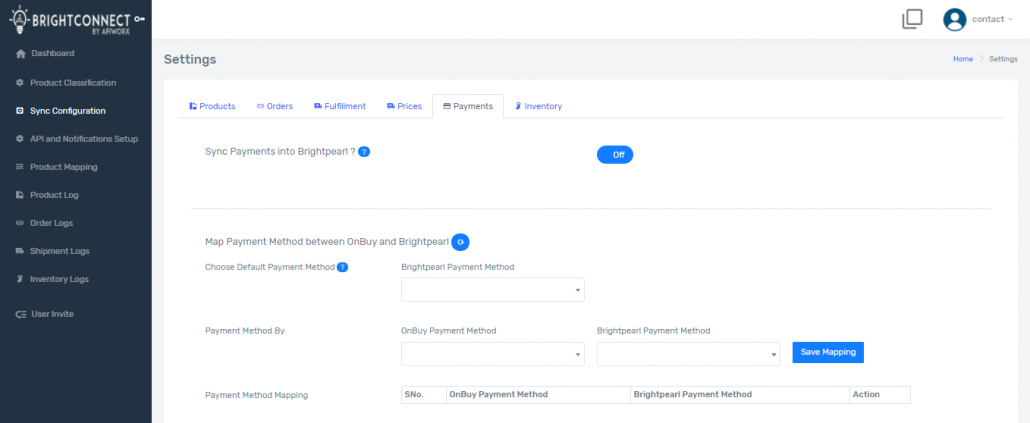
Once payment synchronization is enabled, you can set up a default Payment method in Brightpearl to be used by the system whenever a payment is synchronized from OnBuy to Brightpearl. Additionally, you can map other payment methods one-to-one between platforms according to your preferences.
7. (Inventory Sync Management) – Proceed to the Inventory tab to enable the synchronization of inventory from Brightpearl to OnBuy.
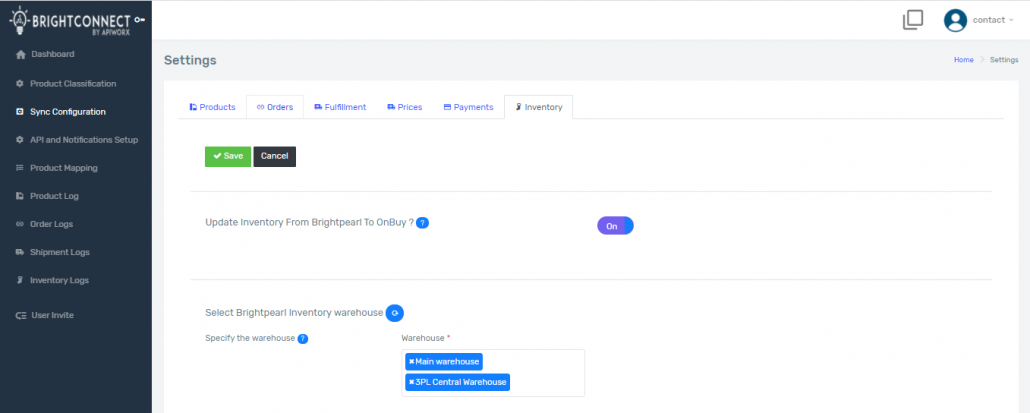
Once enabled, you will need to select the Brightpearl Warehouse(s) from which the system will retrieve the inventory level to synchronize with OnBuy.
How To Use Product Classification To Sync New Products Into OnBuy?
The Product Classification page will assist you in filtering and categorizing your Brightpearl products, enabling you to apply OnBuy Category, Repricing, or Inventory settings to the Products to prepare them for synchronization.
1. Navigate to Product Management > Product Classification page.
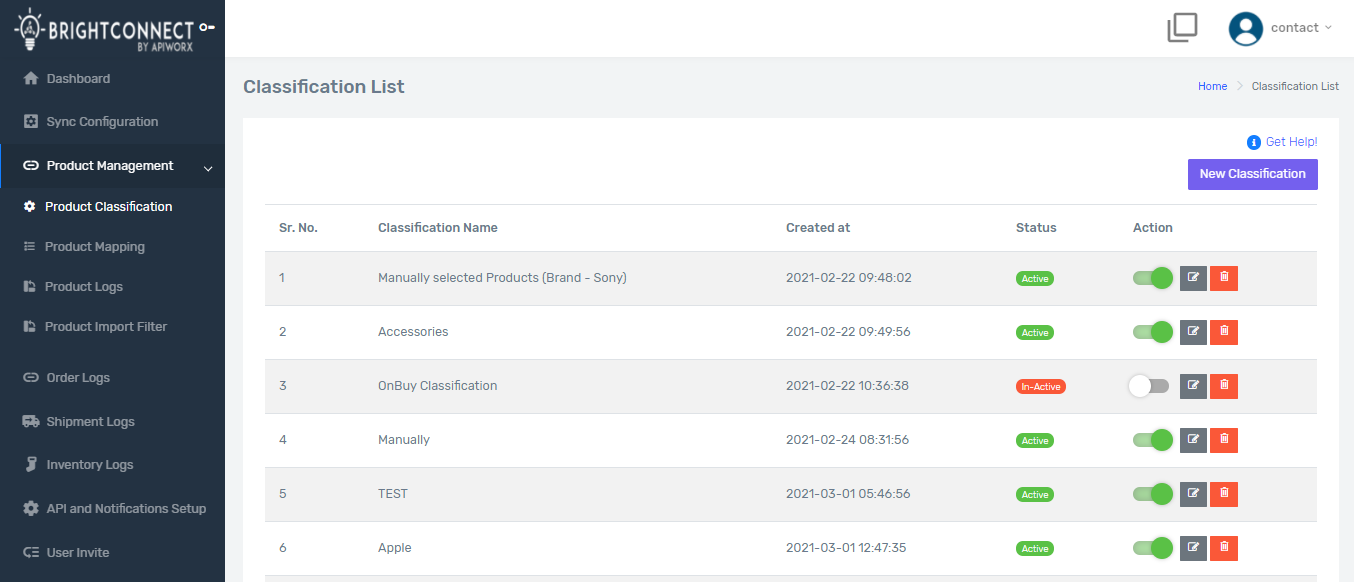
2. Click on the New Classification button and give it a friendly name for easy recall.
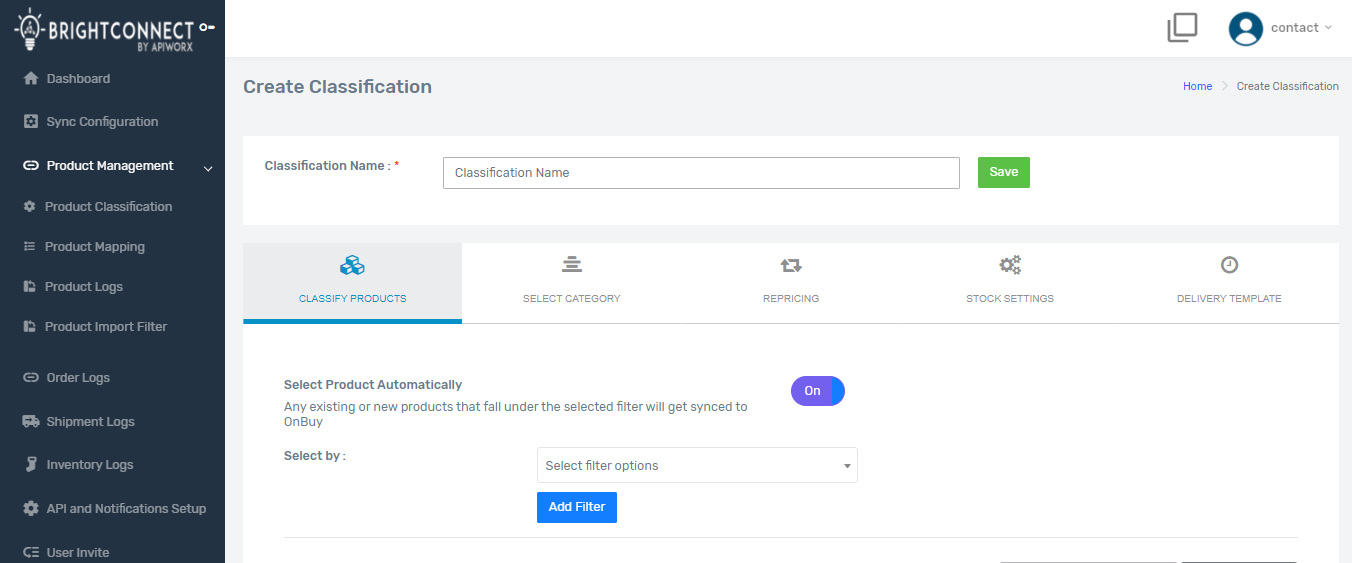
3. Filter and categorize products so that you can set OnBuy Category and other settings for them. There are two options to classify products:
Option 1 – When 'Select Product Automatically' is ON (refer to the screenshot below for guidance).
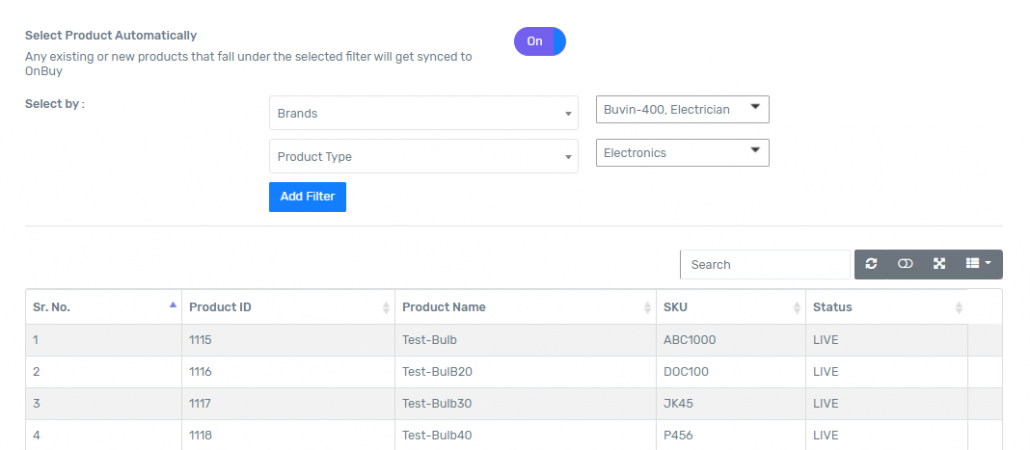
This enables the automatic selection of products by choosing filters (Product type, Brand, Category, or Vendor) and entering their OnBuy Category and additional details.
'Select Product Automatically' implies that any existing or future products that match the selected filter will automatically be mapped with the OnBuy Category chosen in the Classification, along with other settings, and will sync to OnBuy without your manual intervention.
Option 2 – When 'Select Product Automatically' is OFF (refer to the screenshot below for guidance).
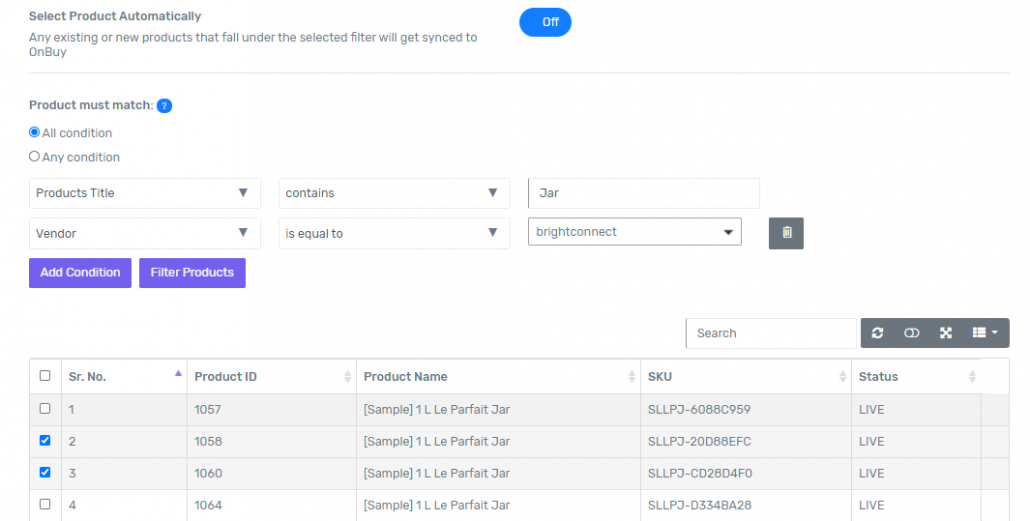
In this option, you can filter products by Product title, Product type, Brand, Category, or Vendor by applying conditions (e.g., All Conditions must match, Any condition must match). Once the conditions and filters are set, you can select products from the filtered table below for categorization.
Only the products you manually select here will be categorized, so if you wish to add more products later, you will need to return to the Classification and edit it to select additional products.
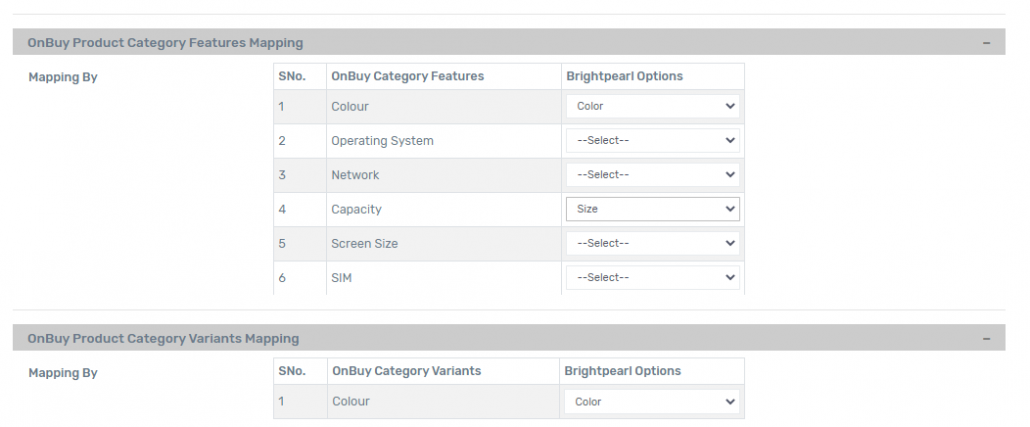
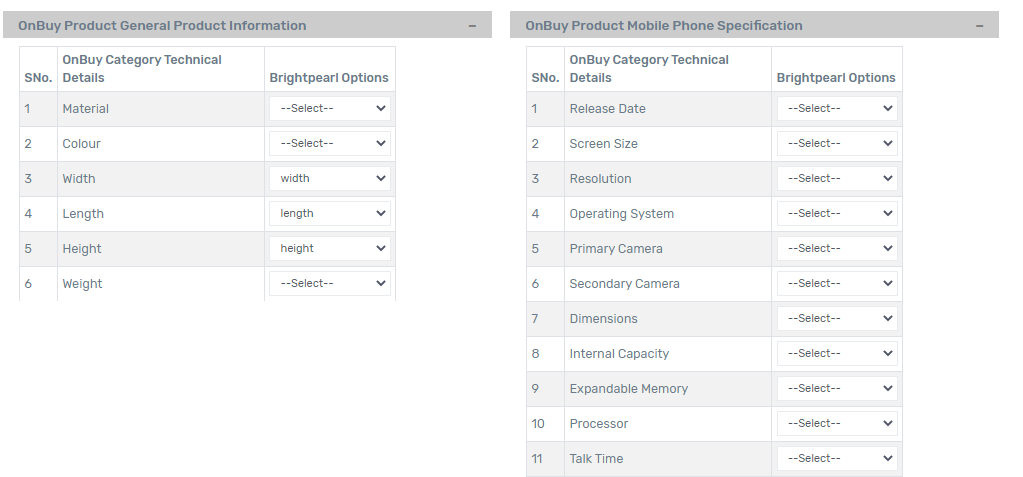
4. Under "Select Category," choose the OnBuy Category you wish to use for listing Products on OnBuy.
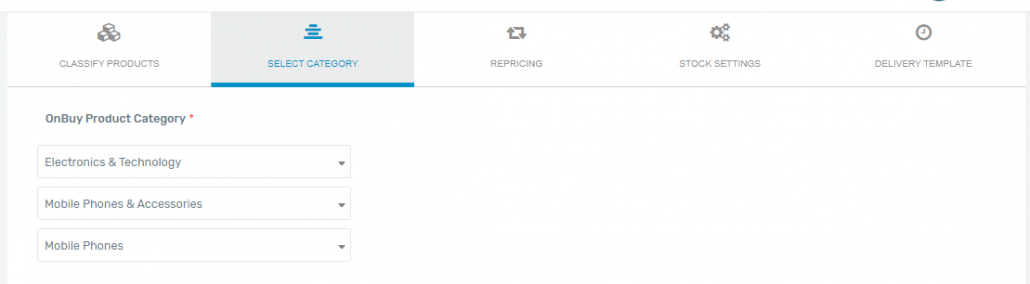
Once selected, additional mappings related to the Product’s Category features, Variants, and other product information will appear. You can optionally map these to Brightpearl Options or custom fields. See below for reference.
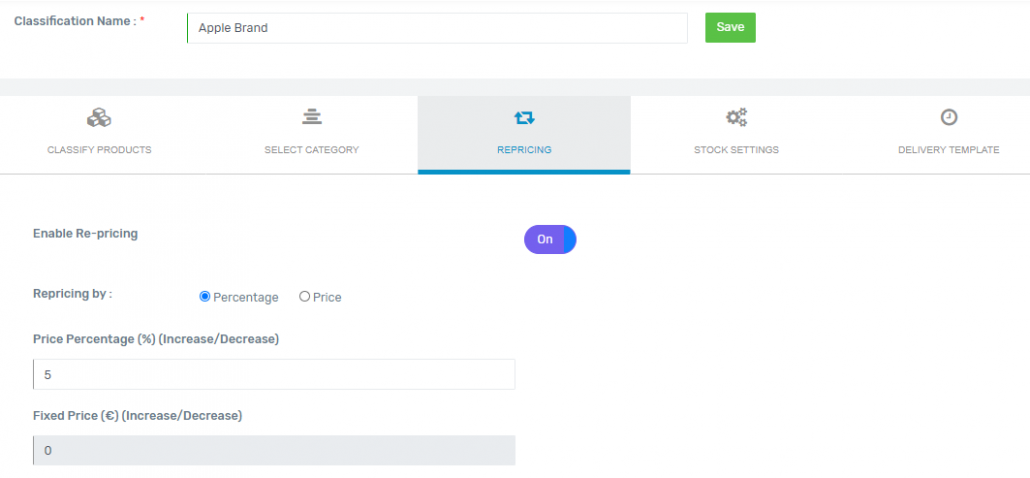
5. In the "Repricing" tab, enable the repricing option for all selected products. This will either increase or decrease (if entering a negative value) the price of Products during synchronization from Brightpearl to OnBuy.
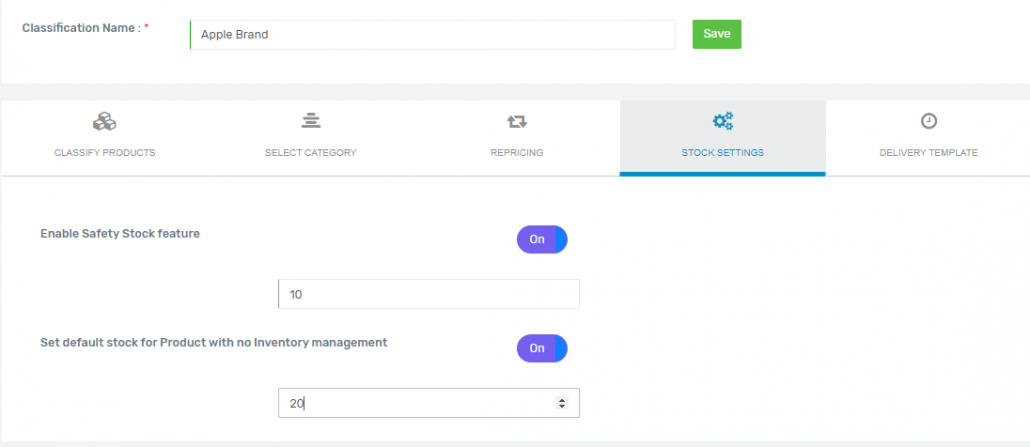
6. In the "Stock Settings" tab, enable the Safety stock feature. Additionally, there is an option to set a default Inventory level for Products marked as “NO” under “Inventory section” in Brightpearl, to prevent marking them as Out of Stock on OnBuy.
7. In the "Delivery Template" tab, select a Delivery method acceptable by OnBuy for your products.
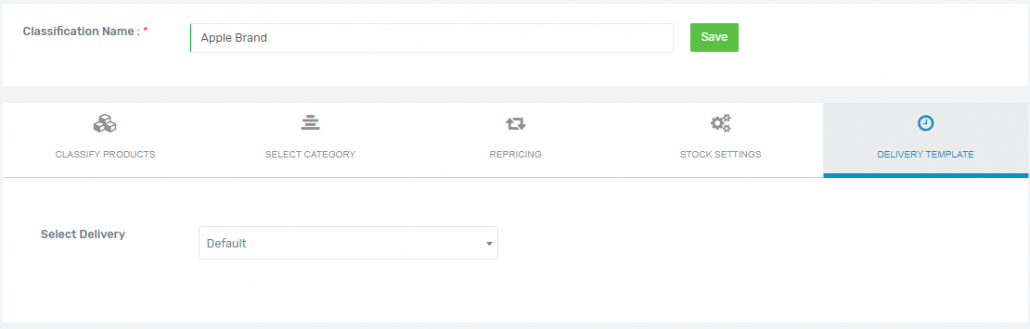
Once you have completed the setup of your Product Classification, click the "Save" button to create and activate it.
Product Classifications can be easily edited, and you can also deactivate them if needed from the Product Classification page.
How To Edit The Product Import Filter?
To review and edit the Product Import filter selected during the registration process, follow the steps below:
1. Log in to BrightConnect's OnBuy.
Note: If you do not yet have an account with BrightConnect’s OnBuy, you can click the 'Register' button to create one.
2. Upon logging in, you will first see the Dashboard. Navigate to Product Management > Product Import Filter in the left menu and click on it.
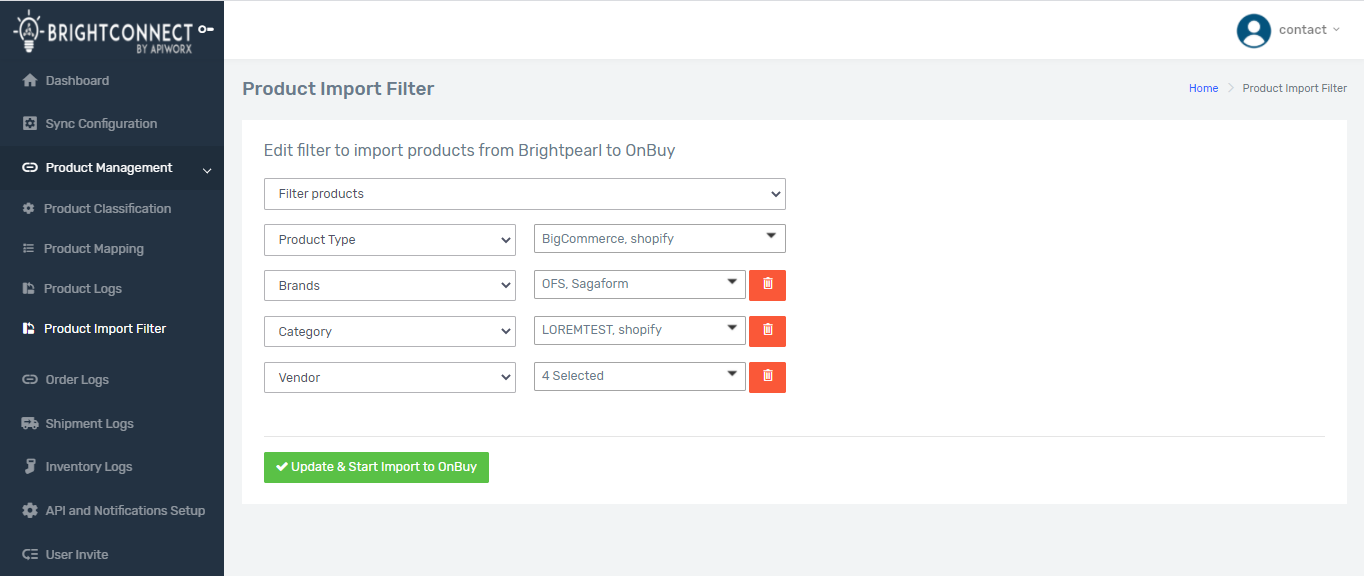
3. Review the existing selected filter and update it as needed. Once you have made the necessary changes, click on 'Update & Start Import to OnBuy Process'.
Note: This filter enables the selection of specific products you wish to sync to OnBuy. Therefore, our system will attempt to sync only those products that match the selected criteria and not any other products that do not meet these requirements.
View Product Sync Logs
To review the Product sync logs from Brightpearl to OnBuy, follow these steps:
1. Log in to BrightConnect's OnBuy.
Note: If you don’t yet have an account with BrightConnect's OnBuy, you can click the 'Register' button to create one.
2. Initially, you will see the Dashboard. Navigate to 'Product logs' in the left menu and click on it.

In the Product Logs, you will find detailed information. The key details are as follows:
i) ProductID-Brightpearl Product Name: This column displays the Product ID from Brightpearl along with the Product name that is synced from Brightpearl to OnBuy.
ii) SKU: This column shows the SKU of the product from Brightpearl.
iii) Inserted Date: Indicates when our system fetched the product from Brightpearl and inserted it into BrightConnect for processing.
iv) Sync Date: Displays the time when the product was last synced or updated from Brightpearl to OnBuy.
v) Product Status: Shows the status of the product on OnBuy, with possible values being 'Active' or 'Inactive'. If a product is active on OnBuy and needs to be inactivated, this can be managed accordingly.
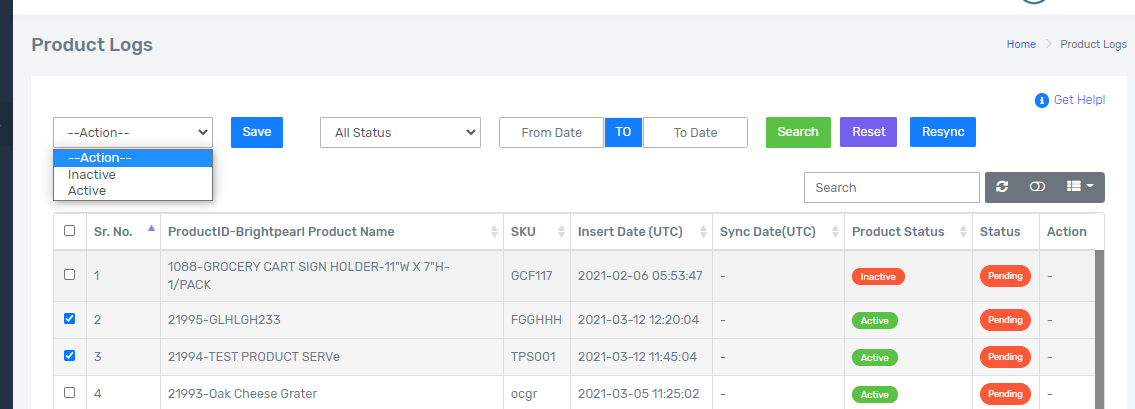
vi) Sync Status: Displays the status of the product's sync from Brightpearl to OnBuy. The statuses include 'Pending', 'Synced', 'Failed', and 'In-Progress'. 'Pending' indicates that product classification is needed to set the proper OnBuy Category and other settings. 'Synced' refers to products that have been successfully synced and are active on the OnBuy marketplace. 'Failed' denotes products whose sync process was unsuccessful (with reasons provided). 'In-Progress' shows products that have been sent to OnBuy for listing but are still in the process of going live.
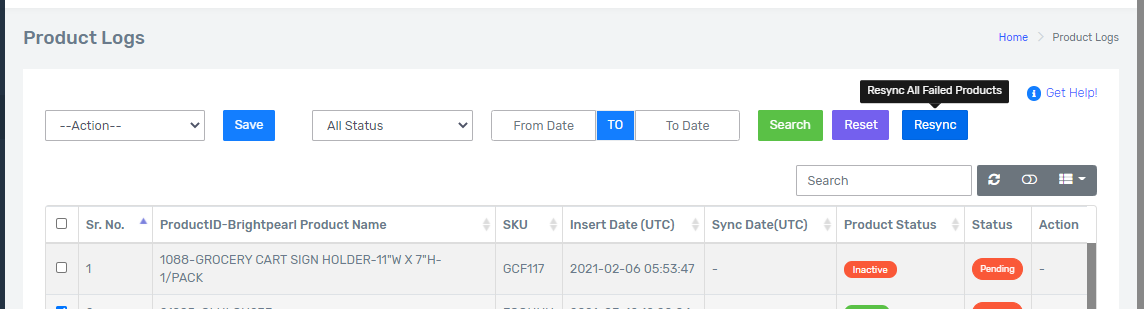
vii) Action: This column includes a 'Re-sync' button for products that failed to sync, allowing you to retry the sync after resolving the issues that caused the failure. Additionally, there is an option at the top to retry syncing all failed products at once.
View Order Sync Logs
To review the Order logs that sync from OnBuy to Brightpearl, follow these steps:
1. Log in to BrightConnect's OnBuy.
Note: If you don’t have an account with BrightConnect's OnBuy, click on the 'Register' button to create one.
2. Initially, you will see the Dashboard. From there, navigate to 'Order logs' in the left menu and click on it.

In the Order Logs, you will find several details, with the main ones listed below:
i) Order Id: This column displays the ID of the OnBuy Order that was processed for syncing.
ii) Brightpearl SO ID: Shows the Brightpearl Sales Order ID created from the OnBuy order.
iii) Order total: Indicates the total amount of the order from OnBuy.
iv) Inserted at: Displays the date when the order was created in our BrightConnect portal.
v) Updated at: Shows the date when the order was last updated on either platform. Updates generally include status updates synced from one platform to another.
vi) Brightpearl Status: Indicates the sync status of the order from OnBuy to Brightpearl. The statuses include 'Pending', 'Synced', and 'Failed'. 'Pending' suggests that certain settings are not configured or the sync is in progress. 'Synced' indicates successful synchronization, while 'Failed' refers to unsuccessful sync attempts, typically with reasons provided.
vii) Inventory Allocation: Shows whether the order item inventory has been reserved in Brightpearl for shipment processing.
viii) Payment status: Indicates the payment creation status for orders synced from OnBuy to Brightpearl. Clicking on the status allows viewing of detailed sync information, including any failure reasons.
ix) Action: This column includes a button that allows you to view full order details, including reasons for sync failures if any.
View Shipment Sync Logs
To review the Shipment logs synced from Brightpearl to OnBuy, follow these steps:
1. Log in to BrightConnect's OnBuy.
Note: If you don’t yet have an account with BrightConnect’s OnBuy, click on the 'Register' button to create one.
2. Upon accessing the Dashboard, navigate to the 'Shipment logs' in the left menu and click on it.
In the Shipment Logs, you will find a range of details, with the main ones outlined below:
i) Order Id: This column displays the ID of the order whose shipment was processed for syncing.
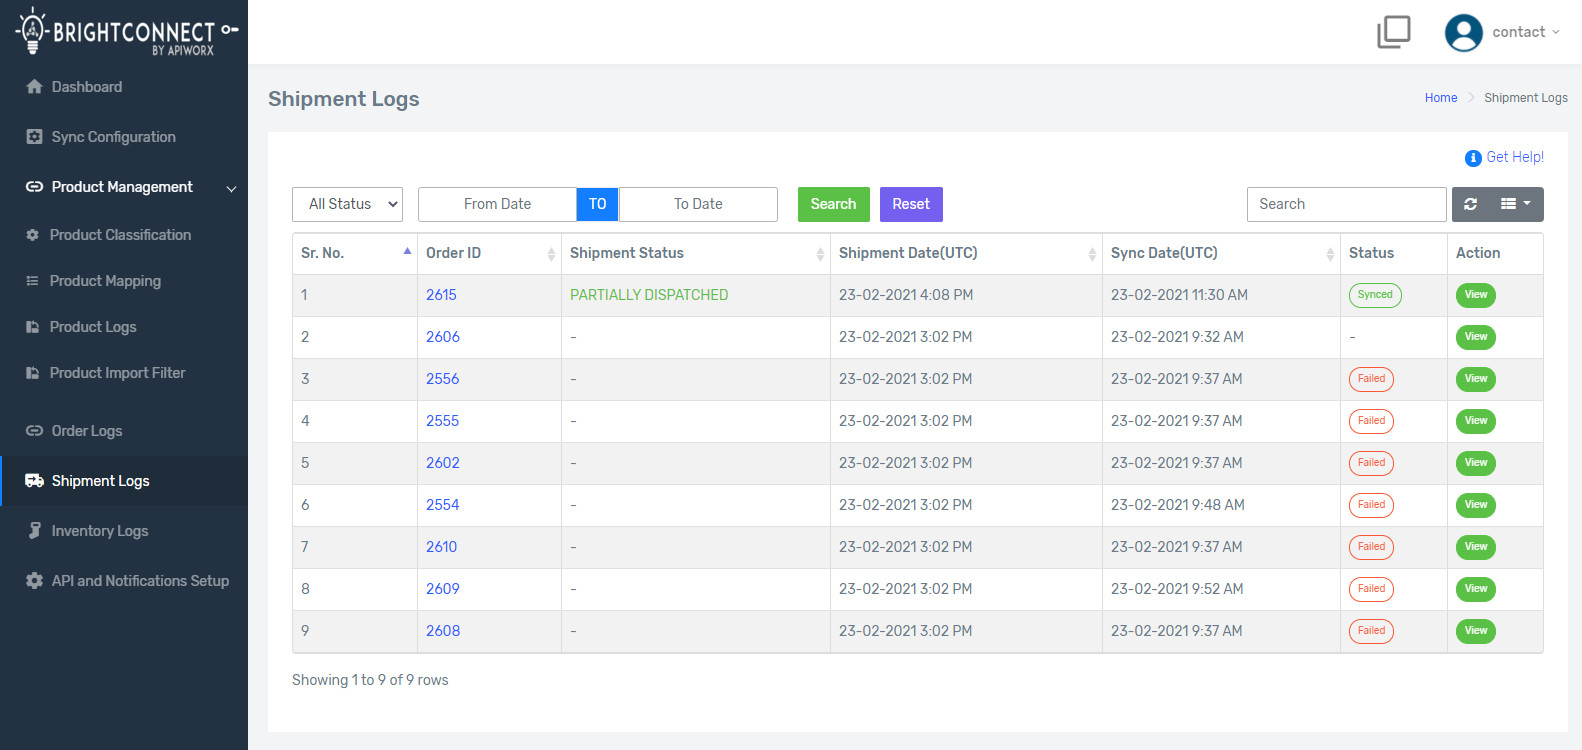
ii) Shipment Status: Shows the shipment status of the order. Typical statuses are 'Fully Dispatched' or 'Partially Dispatched'.
iii) Shipment Date: Indicates the date when the shipment was created in Brightpearl for the OnBuy order.
iv) Sync Date: Displays the date when our system synced the shipment to OnBuy.v) Sync Status: Allows you to see the sync status from Brightpearl to OnBuy. The statuses include 'Pending', 'Synced', and 'Failed'. 'Pending' suggests that certain settings are not configured or the sync is in progress. 'Synced' indicates successful synchronization, while 'Failed' refers to unsuccessful sync attempts, typically with reasons provided.
vi) Action: Includes a button that allows you to view full details of the order’s shipment, including reasons for any failures.
View Inventory Sync Logs
To review the Inventory logs syncing from Brightpearl to OnBuy, follow these steps:
1. Log in to BrightConnect's OnBuy.Note: If you don’t have an account with BrightConnect's OnBuy yet, click on the 'Register' button to create one.
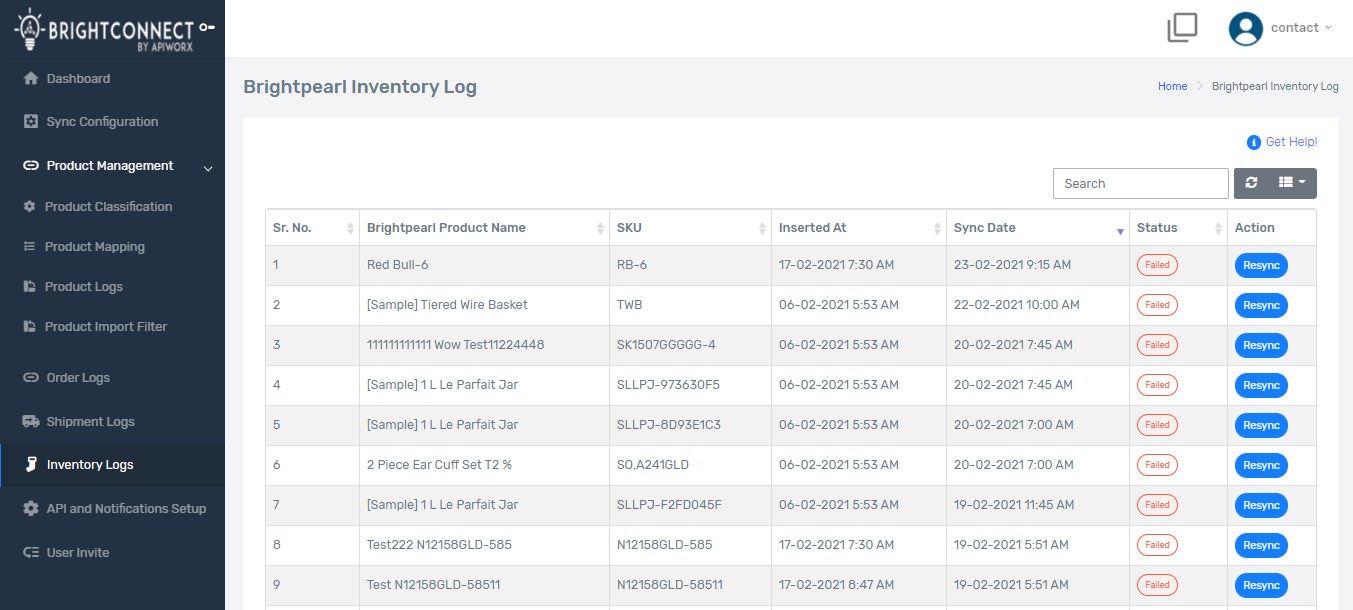
In the Inventory Logs, you will find numerous details, with the key ones outlined below:
ii) SKU: Shows the SKU of the product.
iii) Inserted at: Indicates the date when the product was created in our BrightConnect portal.
iv) Sync Date: Displays the most recent sync date and time of the inventory from Brightpearl to OnBuy for each product.v) Status: Allows you to see the sync status from Brightpearl to OnBuy. The statuses include 'Pending', 'Updated', and 'Failed'. 'Pending' suggests that some settings are not configured or the sync is in progress. 'Updated' indicates successful synchronization, while 'Failed' refers to unsuccessful sync attempts. Hovering over the 'Status' column will display the reason for failure, if any.

vi) Action: Includes a button that allows you to retry the sync in the event of any automated sync failure.